> ## Documentation Index
> Fetch the complete documentation index at: https://docs.m3ter.com/llms.txt
> Use this file to discover all available pages before exploring further.
# Billing Data Explorer
You can use the *Billing Data Explorer* to configure and perform queries against your Organization's Billing data. You can quickly set up and submit a query that returns the billing data set needed to serve your current analytical purposes. You can then review the data in either a flat Data Table or a Pivot Table format.
This topic explains how to work successfully in the Billing data explorer to configure and perform queries against your Billing data and review the returned data.
**Important! Required Permissions for performing Billing queries in Data Explorer**. If you create a Custom Permission Policy to assign to your Organization Users and want Users to be able to perform Billing queries and view the results, ensure the Permission Policy allows:
* Create and Retrieve action for the `config:analyticsJob` Resource.
* Retrieve action for the `config:bill` Resource.
For more details on working with Permission Policies, see [Understanding, Creating and Managing Permission Policies](/guides/organization-and-access-management/creating-and-managing-permissions).
## Building and Performing a Billing Data Query
**To submit queries for Billing data and review returned data:**
1. Select **Billing>Billing Data Explorer**:
 The **Billing Data Explorer** page opens and you can use the **Billing query builder** to build a query for your Organization's billing data.
2. In the **Select period** section, define a period to retrieve billing data for:
* **Time period**. Use the drop-down list to select a period for which you want to retrieve billing data. **Today** is the default. If you want to select a specific period, you can use **Custom**.
* **Today**. All of today - that is, the 24 hour period from midnight to midnight. This saves you from having to reset the query time period to catch other new billing data that become available later that same day.
* **Yesterday**. All of yesterday - that is, the 24 hour period from midnight to midnight yesterday.
* **Week to date/Month to date**. Period covering the current week/month to date. For example, selecting **Month to date** on April 8th, 2024 means your query returns data for the time period starting April 1st, 2024 and including the entire current day - April 8th - and ending at midnight. This saves you from having to reset the query time period to catch other new billing data that become available later that same day.
* **Last 7/30/90/120 days**. Period covering the selected number of whole days leading up to today. For example, selecting **Last 30 days** on April 8th, 2024 means your query returns data for the time period commencing 30 days prior - March 9th, 2024 - and ending midnight on April 7th, 2024.
* **Previous week/month/quarter**. Period covering the entire previous week/month/quarter. For example, selecting **Previous month** on April 8th, 2024 means your query returns data for the whole of March 2024.
* **Custom**. Define the time period for which you want your query to return data.
* **Start (inclusive)** and **End (exclusive)**. If you have selected **Custom** for the query **Time period**, these date/time fields will be enabled. You can use calendar popups to select the start and end dates/times for the period you want to query.
* Start dates are explicitly labeled as *inclusive* and End dates as *exclusive*. For example, if you want data returned for the entire month of June 2023, you must set the **Start** at June 1st 2023 and the **End** at July 1st 2023. If you set the **End** at June 30th 2023, the Custom Time period for your query will end at midnight on June 29th 2023.
**Warning and Notes:**
* **Warning!** Billing Data Explorer will filter on the basis of Bill *start dates*. For example, if you want your query to return the line items for a November 1st Bill for an Account that is set up for monthly billing on the 1st of each month, you must ensure the **Time period** you select includes October 1st, since that is the start date of the billing period for the the November 1st Bill on the Account.
* **Note: Timezone for Query Start and End Dates/Time?** The **Start date** and **End date** fields will show the timezone you've set for your Organization. See [Managing your Organization](/guides/organization-and-access-management/viewing-and-editing-organization).
3. In the **Apply filters** section, enter the details of any filters you want to apply to the billing data returned for your query:
* **Line item types**. Filter on line item types:
* **All Line item types**. Data will be returned for all Bill line item types.
* **Selected values**. Use the drop-down to select the Bill line item types for which you want to return Billing data.
* **Accounts**. Filter on Accounts:
* **All Accounts**. Data will be returned for all Accounts for which Bills have been created.
* **Selected values**. Use the drop-down to select the Account Code of those Accounts for which you want to return Billing data.
* **Products**. Filter on Products:
* **All Products**. Data will be returned for all Products for which a Bill has been created.
* **Selected values**. Use the drop-down to select the Products for which you want to return Billing data.
The **Billing Data Explorer** page opens and you can use the **Billing query builder** to build a query for your Organization's billing data.
2. In the **Select period** section, define a period to retrieve billing data for:
* **Time period**. Use the drop-down list to select a period for which you want to retrieve billing data. **Today** is the default. If you want to select a specific period, you can use **Custom**.
* **Today**. All of today - that is, the 24 hour period from midnight to midnight. This saves you from having to reset the query time period to catch other new billing data that become available later that same day.
* **Yesterday**. All of yesterday - that is, the 24 hour period from midnight to midnight yesterday.
* **Week to date/Month to date**. Period covering the current week/month to date. For example, selecting **Month to date** on April 8th, 2024 means your query returns data for the time period starting April 1st, 2024 and including the entire current day - April 8th - and ending at midnight. This saves you from having to reset the query time period to catch other new billing data that become available later that same day.
* **Last 7/30/90/120 days**. Period covering the selected number of whole days leading up to today. For example, selecting **Last 30 days** on April 8th, 2024 means your query returns data for the time period commencing 30 days prior - March 9th, 2024 - and ending midnight on April 7th, 2024.
* **Previous week/month/quarter**. Period covering the entire previous week/month/quarter. For example, selecting **Previous month** on April 8th, 2024 means your query returns data for the whole of March 2024.
* **Custom**. Define the time period for which you want your query to return data.
* **Start (inclusive)** and **End (exclusive)**. If you have selected **Custom** for the query **Time period**, these date/time fields will be enabled. You can use calendar popups to select the start and end dates/times for the period you want to query.
* Start dates are explicitly labeled as *inclusive* and End dates as *exclusive*. For example, if you want data returned for the entire month of June 2023, you must set the **Start** at June 1st 2023 and the **End** at July 1st 2023. If you set the **End** at June 30th 2023, the Custom Time period for your query will end at midnight on June 29th 2023.
**Warning and Notes:**
* **Warning!** Billing Data Explorer will filter on the basis of Bill *start dates*. For example, if you want your query to return the line items for a November 1st Bill for an Account that is set up for monthly billing on the 1st of each month, you must ensure the **Time period** you select includes October 1st, since that is the start date of the billing period for the the November 1st Bill on the Account.
* **Note: Timezone for Query Start and End Dates/Time?** The **Start date** and **End date** fields will show the timezone you've set for your Organization. See [Managing your Organization](/guides/organization-and-access-management/viewing-and-editing-organization).
3. In the **Apply filters** section, enter the details of any filters you want to apply to the billing data returned for your query:
* **Line item types**. Filter on line item types:
* **All Line item types**. Data will be returned for all Bill line item types.
* **Selected values**. Use the drop-down to select the Bill line item types for which you want to return Billing data.
* **Accounts**. Filter on Accounts:
* **All Accounts**. Data will be returned for all Accounts for which Bills have been created.
* **Selected values**. Use the drop-down to select the Account Code of those Accounts for which you want to return Billing data.
* **Products**. Filter on Products:
* **All Products**. Data will be returned for all Products for which a Bill has been created.
* **Selected values**. Use the drop-down to select the Products for which you want to return Billing data.
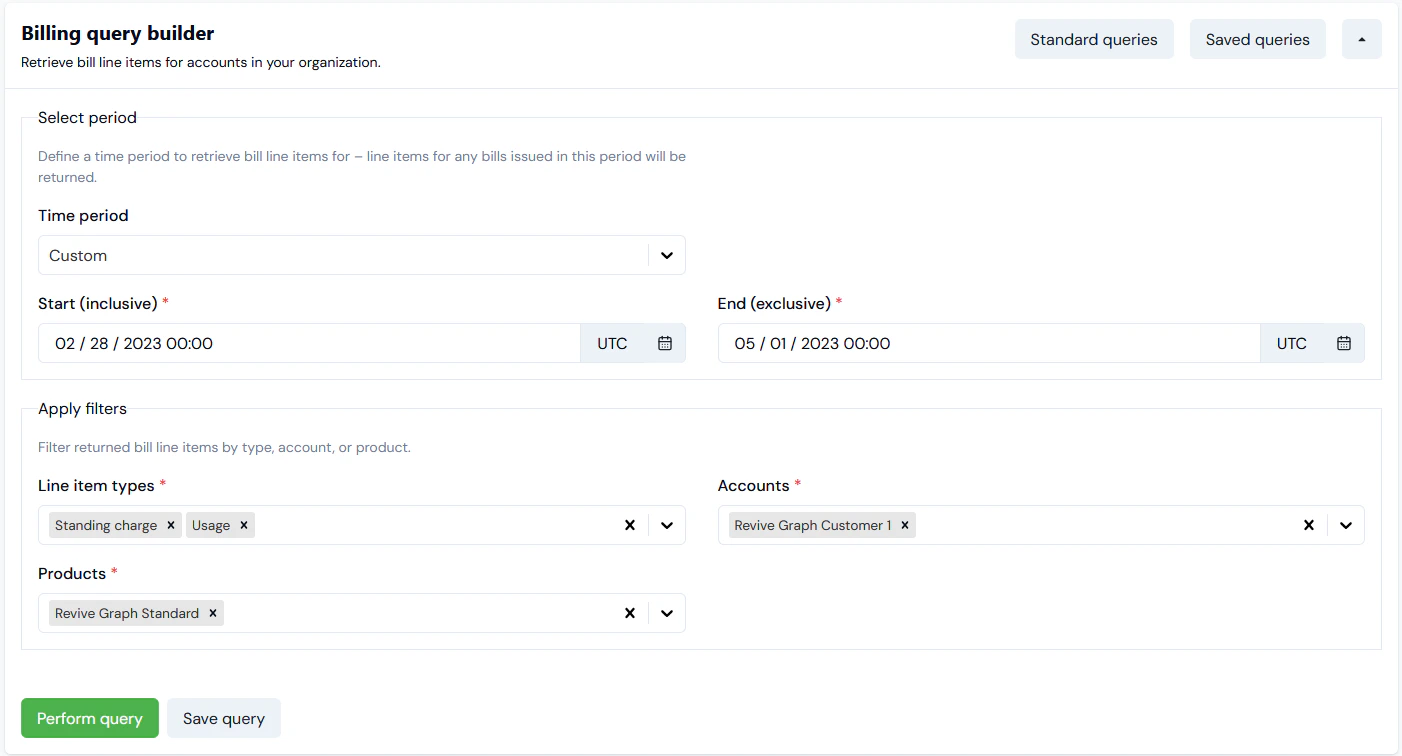 In this example we have:
* Defined a **Custom** time period. The Organization Timezone is set to **UTC**.
* Selected a single Account and a single Product to return Billing data for.
* Selected for two line item types in the returned Billing data.
4. Select **Perform query**. The query executes and the resultant data is loaded into the data tables.
**Important: Limits imposed on response payload size and number of rows!**
* **Response too Large:** If the response payload for your query is **>10MB**, this exceeds the limit and you'll receive an error message to inform you. You can either use the available filters to further limit the query result set and re-run your query or use the **Export** button to download the current results in a `.csv` formatted file - see [Exporting Query Results](/guides/data-explorer/exporting-usage-query-results).
* **Number of Rows Returned for Query:** If the number of rows returned by your query exceeds **5001** but the payload size limit is not exceeded, then only the first **5001** are loaded. You will not receive an error and if you suspect your query return contained more rows, we recommend you use the **Export** button to download the results in a `.csv` formatted file and check.
* **Number of Rows for Export:** If you download the query results in a `.csv` formatted file, the number of rows is limited to **20001**.
## Reviewing Billing Data Query Results in a Data Table
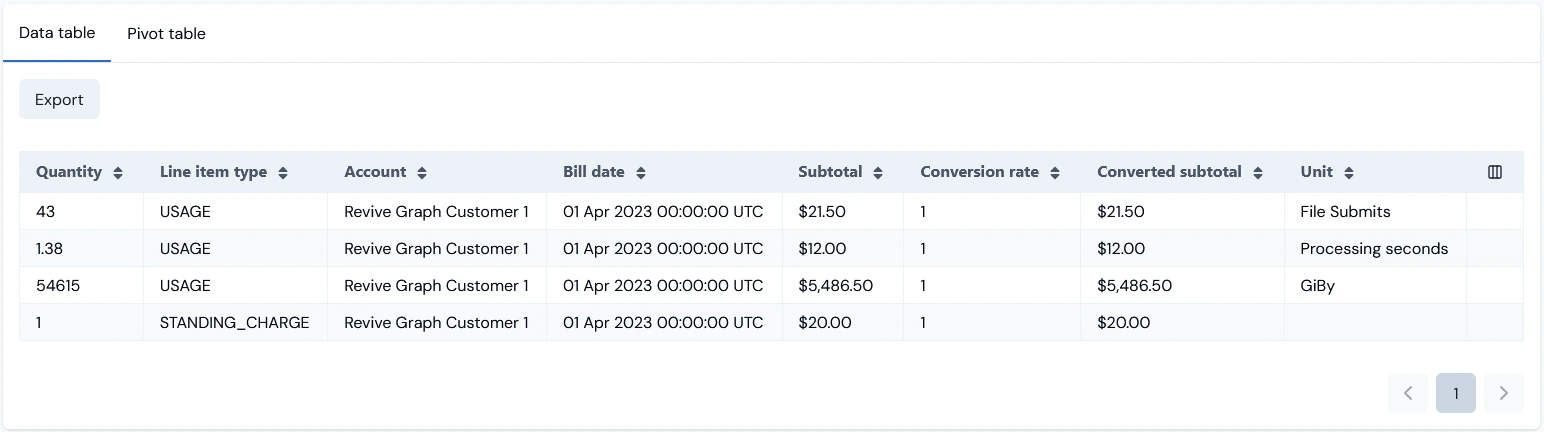
You can review the Billing data returned for your query in a **Data table**:
In this example we have:
* Defined a **Custom** time period. The Organization Timezone is set to **UTC**.
* Selected a single Account and a single Product to return Billing data for.
* Selected for two line item types in the returned Billing data.
4. Select **Perform query**. The query executes and the resultant data is loaded into the data tables.
**Important: Limits imposed on response payload size and number of rows!**
* **Response too Large:** If the response payload for your query is **>10MB**, this exceeds the limit and you'll receive an error message to inform you. You can either use the available filters to further limit the query result set and re-run your query or use the **Export** button to download the current results in a `.csv` formatted file - see [Exporting Query Results](/guides/data-explorer/exporting-usage-query-results).
* **Number of Rows Returned for Query:** If the number of rows returned by your query exceeds **5001** but the payload size limit is not exceeded, then only the first **5001** are loaded. You will not receive an error and if you suspect your query return contained more rows, we recommend you use the **Export** button to download the results in a `.csv` formatted file and check.
* **Number of Rows for Export:** If you download the query results in a `.csv` formatted file, the number of rows is limited to **20001**.
## Reviewing Billing Data Query Results in a Data Table
You can review the Billing data returned for your query in a **Data table**:
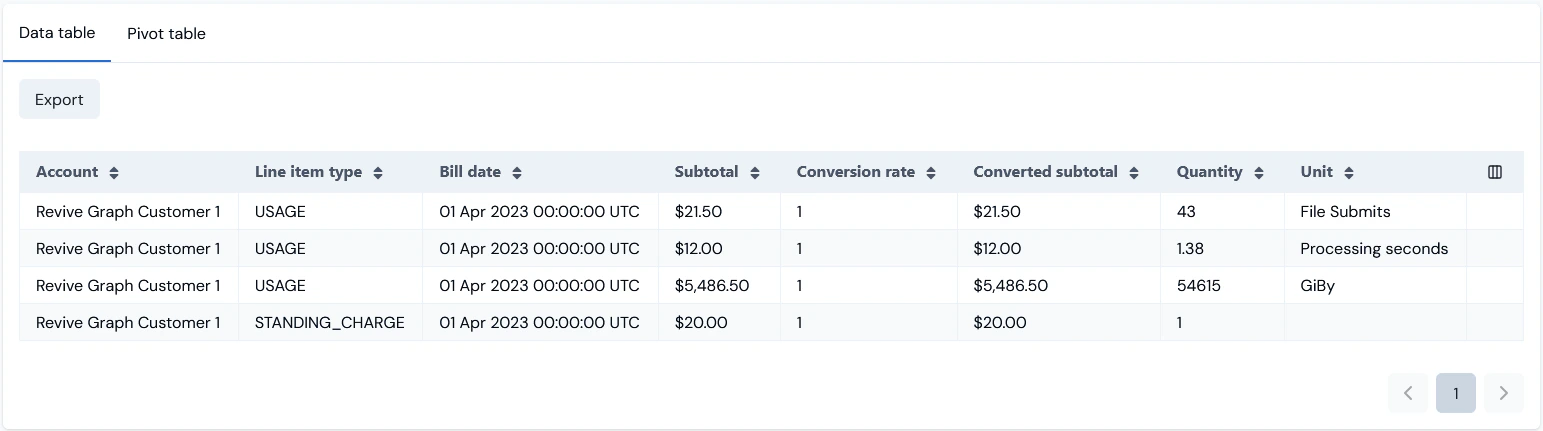 You can make adjustments to the **Data table** to:
* Show/Hide data element columns.
* Reorder the columns.
**To Show/Hide columns:**
1. Select the column icon at top-right of the table:
You can make adjustments to the **Data table** to:
* Show/Hide data element columns.
* Reorder the columns.
**To Show/Hide columns:**
1. Select the column icon at top-right of the table:
 A panel appears showing the columns available for the table and you can use switches to select your Show/Hide preferences:
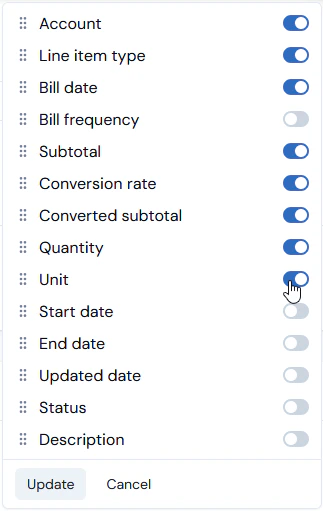 2. Select **Update** - the panel closes and the **Data table** refreshes for your Show/Hide selections.
**To reorder columns:**
1. Select the column icon at top-right. A panel appears listing the available table columns.
2. Drag-and-drop these into a top-bottom ordering to correspond to the left-right ordering you want for the **Data table**:
2. Select **Update** - the panel closes and the **Data table** refreshes for your Show/Hide selections.
**To reorder columns:**
1. Select the column icon at top-right. A panel appears listing the available table columns.
2. Drag-and-drop these into a top-bottom ordering to correspond to the left-right ordering you want for the **Data table**:
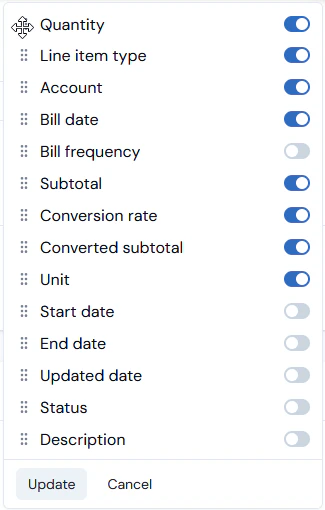 2. Select **Update**. The panel closes and the **Data table** refreshes for the selected column order:
 ## Reviewing Billing Data Query Results in a Pivot Table
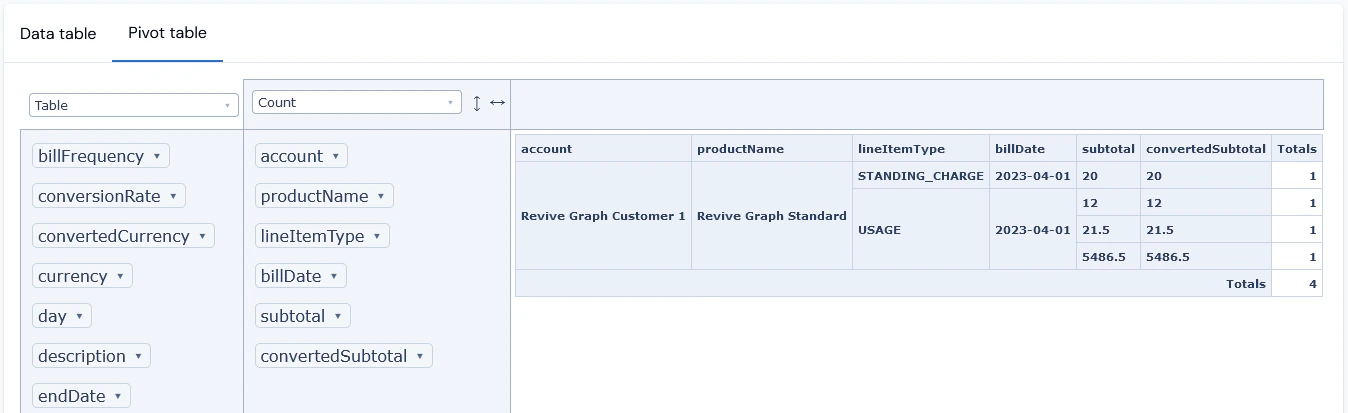
You can review the Billing data returned for your query in a **Pivot table**:
## Reviewing Billing Data Query Results in a Pivot Table
You can review the Billing data returned for your query in a **Pivot table**:
 **Tip: Saving Billing Queries?** You can save, update already saved, and re-use saved Billing queries. You can also load pre-configured *Standard Queries* directly into the Query Builder. See [Saving, Updating, and Re-Using Queries](/guides/data-explorer/saving-queries).