> ## Documentation Index
> Fetch the complete documentation index at: https://docs.m3ter.com/llms.txt
> Use this file to discover all available pages before exploring further.
# Example 1: Cloud Storage and File Cleanup
> Follow a detailed example with step-by-step instructions on how to set up the pricing metrics, submit test data, generate bills, and verify billing amounts against usage.
Suppose you run a SaaS company that provides cloud storage and file cleanup services for corrupted graphics files. You want to charge your customers in US dollars on a monthly basis using the following usage pricing metrics:
* By cumulative volume of corrupted files submitted for storage and cleanup in the month measured in gigabytes, irrespective of how long they remain stored in any given month and irrespective of whether they ever are retrieved. Charge rate is \$0.15 per GB for the first 500GB; \$0.10 per GB thereafter.
* By count of the number of corrupted files submitted for storage and cleanup in the month, charged at \$0.50 per file.
* By an add-on amount each month based on the maximum average clean up processing time required per submitted files in any given month: charged at \$12 for up to 4 seconds maximum average processing; \$25 for up to 6 seconds maximum average processing; \$50 for anything above 6 seconds maximum average processing.
In addition to any usage charges, you want to apply a monthly standing charge of \$20.
This topic provides a worked example and steps you through the setup required to implement this SaaS usage-based pricing (UBP) model. It goes on to show you how to submit some sample usage data against a test Account, generate a Bill for that Account, and check billing amounts against submitted usage.
**Tip: New to m3ter?** If you are new to m3ter, this worked example step-through topic assumes no prior knowledge of working with the m3ter. The example is intended to give you a quick start experience of m3ter, demonstrating how easily you can set things up to implement UBP for your products and services. You can also see how to ingest some test usage data into the m3ter system and generate sample Bills to check your UBP implementation before deploying it to your live production environment.
## Step 1: Create Product
*Products* represent a product or service that you offer to your end customers. A Meter, Aggregation, Plan Template, Plan, or Pricing typically all belong to a Product.
**To create a Product:**
1. In the Console, select **Products**. The **Products** page opens.
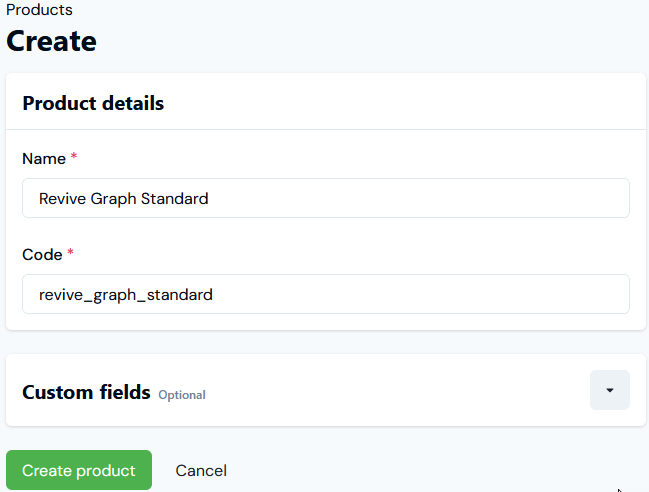
2. Select **Create product**. We'll create a single Product called **Revive Graph Standard**:
3. Select **Create product**.
The **Revive Graph Standard** Product can now serve as a container for any Meters, Aggregations, Pricing, Plans, and Plan Templates we'll need for the example.
> **More Details:** [Creating and Managing Products](/guides/creating-and-managing-products)
## Step 2: Set up Meter
*Meters* define the data fields that your system will use to submit usage date to the m3ter platform:
* As well as simple data fields, which collect raw usage data, you can define derived fields that reference and apply calculations to simple fields. For the example, we'll create three data fields and a single derived field to meet the pricing requirements.
* You can create Product-specific Meters or Global Meters. For the example, we'll create a single Meter for our example Product.
**To create a Meter:**
1. Select **Metering**. The **Meters** page opens.
2. In the **Product** drop-down, select **Revive Graph Standard**.
3. Select **Create meter**.
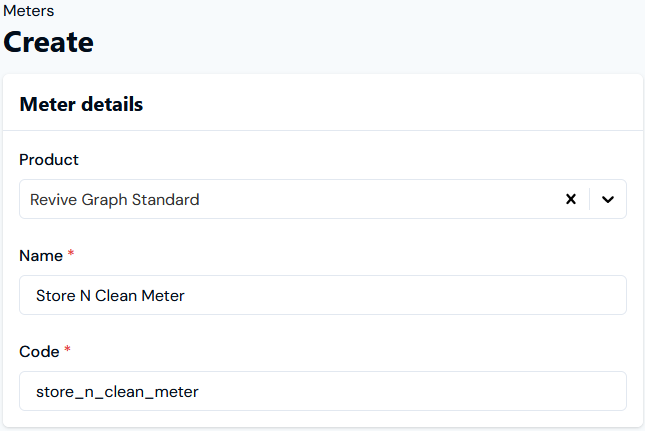
Here's the Meter set up to support the pricing model we want to use in the example:
* **Meter details**:
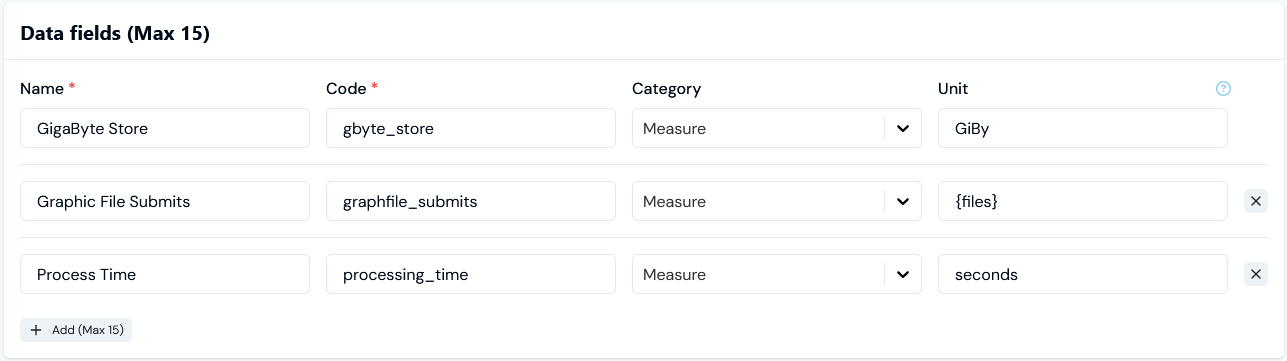
* **Data fields**:
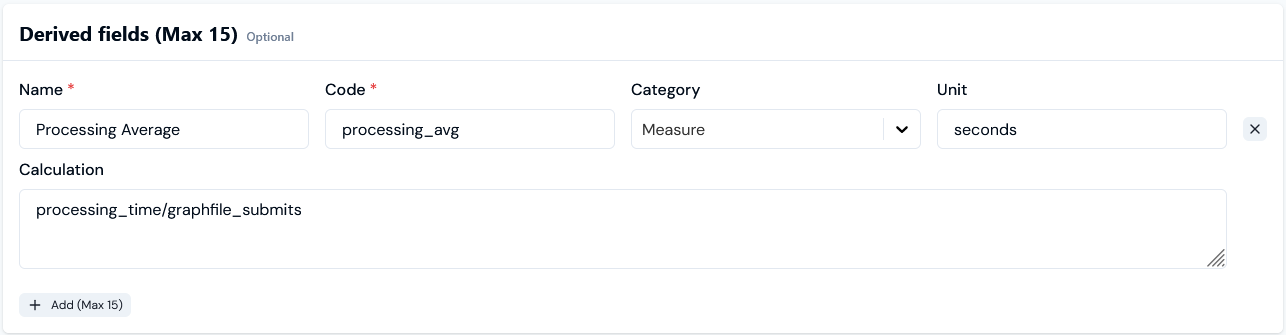
* **Derived fields**:
For the example, we've created the **Store N Clean Meter** and added the following fields to capture usage data:
* Three Data Fields of type **Measure**:
* **GigaByte Store** to collect quantitative data on the file storage volume in Gigabytes.
* **Graphic File Submits** to collect quantitative data on the number of files submitted.
* **Process Time** collect quantitative data on the total processing time required to clean files in seconds.
* One Derived Field of type **Measure**:
* **Processing Average** to reference two of the Data Fields and apply a calculation to derive the average processing time required per set of submitted files.
4. Select **Create meter**.
We now have a single Meter for the example, which we can use to collect usage data on any Account that consumes the **Revive Graph Standard** Product. This metered usage data will serve as the basis for the pricing metrics we want to apply to rate Product consumption.
> **More Details:** [Reviewing Meter Options](/guides/usage-data-meters/reviewing-meter-options) and [Creating Meters](/guides/usage-data-meters/creating-meters)
## Step 3: Define Aggregations
*Aggregations* define how to transform into a single number the individual measurements submitted to a Meter Data Field as usage data. For example, you may choose to simply SUM the submitted usage data values. In this way, Aggregations define the usage-based pricing metrics you'll use to set up pricing for your products and services.
For the usage-based pricing model we want to implement in our example, we'll need to create three Aggregations based on the usage data collected by our **Store N Clean Meter**. Each Aggregation will target a different Meter field to define a pricing metric:
* For cumulative volume of graphic files submitted for storage and cleanup, we'll target the **GigaByte Store** Data Field.
* For number of files submitted for storage and cleanup, we'll target the **Graphic File Submits** Data Field.
* For maximum average clean up processing time, we'll target the **Processing Average** Derived Field.
**To create an Aggregation:**
1. Select **Metering**. The **Meters** page opens.
2. Select **Aggregations**:
3. In the **Product** drop-down, select **Revive Graph Standard**.
4. Select **Create aggregation**.
Here's the setup for the first Aggregation:
* **Aggregation details**:
* **Meter settings**:
* **Aggregation settings**:
The **Gigabyte Store Aggregation** gives us our first pricing metric by:
* Targeting the **Gigabyte Store** field on the **Store N Clean Meter** and uses the **Sum** of the Gigabytes stored.
* We leave the **Quantity per unit** setting at **1**, since we'll configure a tiered pricing by the Gigabyte using this Aggregation.
5. Select **Create Aggregation**.
6. Repeat steps **4.** and **5.** to create another two Aggregations:
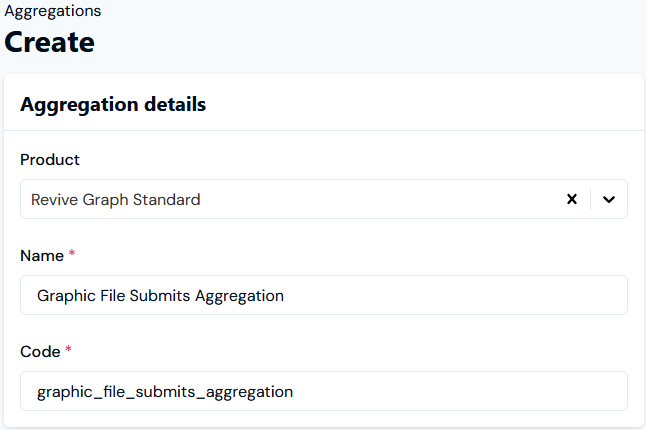
Here's the setup for the second Aggregation:
* **Aggregation details**:
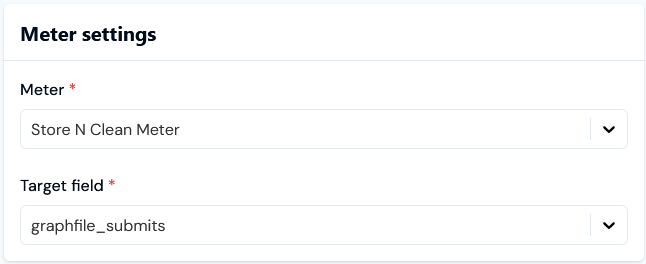
* **Meter settings**:
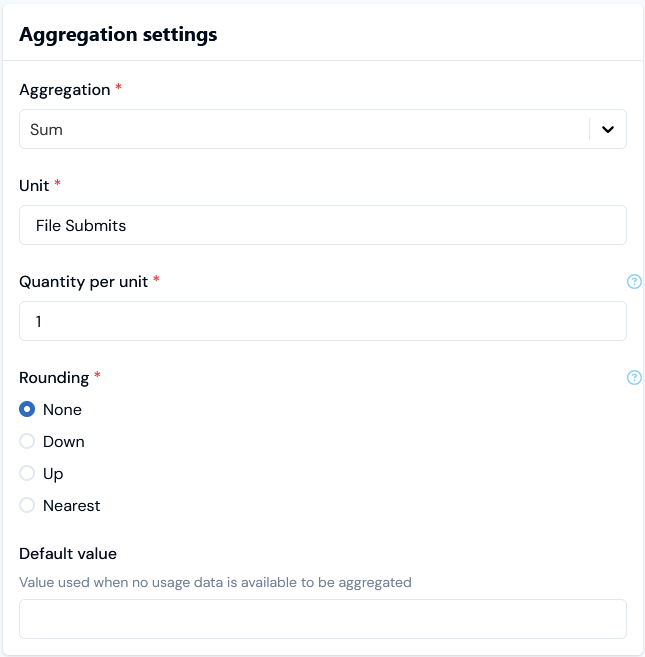
* **Aggregation settings**:
The **Graphic File Submits Aggregation** gives us our second pricing metric by:
* Targeting the **Graphic File Submits** field on the **Store N Clean Meter** and uses a **Sum** of file submissions.
* We leave the **Quantity per unit** setting at **1**, since we'll configure a flat rate pricing by file submissions using this Aggregation.
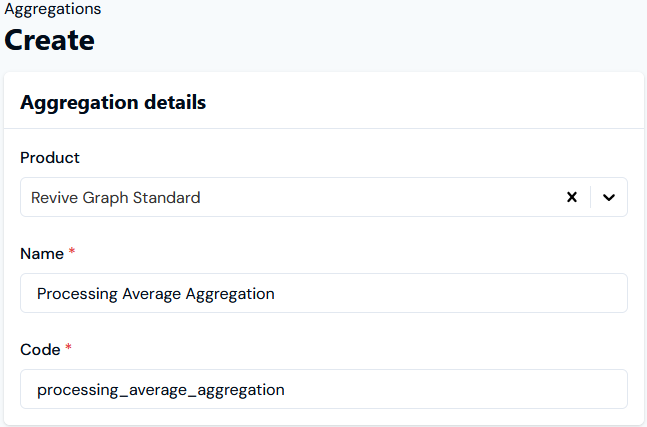
Here's the setup for the third Aggregation:
* **Aggregation details**:
* **Meter settings**:
* **Aggregation settings**:
The **Processing Average Aggregation** gives us our third pricing metric by:
* Targeting the **Processing Average** derived field on the **Store N Clean Meter** and uses the **Maximum** value resulting from the calculation built into the field.
* We leave the **Quantity per unit** setting at **1**, since we'll configure a tiered pricing by number of seconds using this Aggregation.
> **More Details:** [Reviewing Aggregation Options](/guides/usage-data-aggregations/reviewing-aggregation-options) and [Creating Aggregations](/guides/usage-data-aggregations/creating-aggregations)
## Step 4: Create Product Plan
*Plans* represent a pricing plan for one of your products or services. A Plan is always derived from a Plan Template and inherits settings from the Plan Template which control billing operations, such as billing frequency and currency. You can override some of these settings when you create a Plan from a Plan Template. To meet the example requirements:
* First, we'll need a Plan Template for the **Revive Graph Standard** Product. We'll configure the Plan Template:
* For monthly billing using a specific billing currency.
* To include for a Standing charge to be applied for each billing period.
* Second, we can then create a Product Plan based on the Plan Template. The Plan will then inherit the monthly billing frequency and Standing charge billing amount from the Plan Template.
**To create a Product Plan Template:**
1. Select **Pricing**. The **Plans** page opens.
2. Select **Plan templates**:
The **Plan templates** page opens.
3. In the **Product** drop-down, select **Revive Graph Standard**.
4. Select **Create plan template**. The **Create** page opens.
Here's the setup for the **Plan template details**:
For the **Revive Graph Standard Plan Template** we've:
* Chosen **US dollars** as the billing currency.
* Selected a monthly **Bill frequency** with a **Bill interval** of **1**, which means Accounts put on the Plan will receive a Bill each month for a month's period of usage.
5. Configure the settings for **Standing charge** and **Minimum spend** amounts:
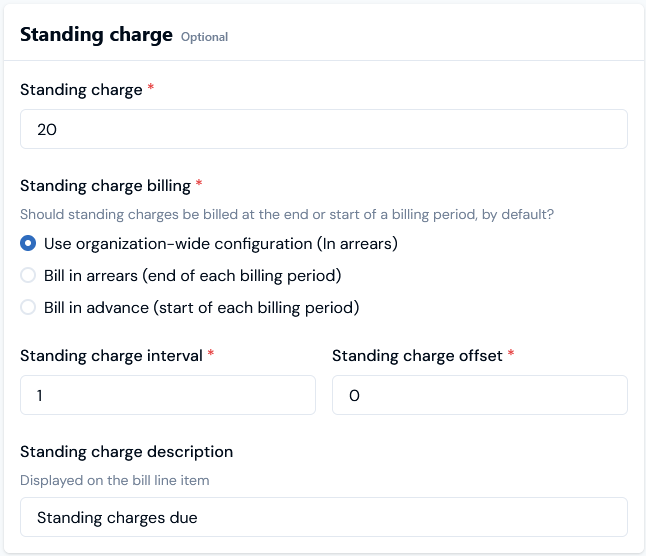
* **Standing charge** settings:
* Set a **Standing charge** of **\$20** per month as required for the example.
* For **Standing charge billing**, leave **Use organization-wide configuration** checked for **(In arrears)**.
* Set **Standing charge interval** at **1** to charge this amount on every monthly Bill.
* Set **Standing charge offset** at **0** to apply this charge from the first Bill.
* Enter a **Standing charge description** if you wish - this will show against the Standing charge line items on customer Bills.
* **Minimum spend** settings:
* Omit a **Product minimum spend** per billing period, since this is not required for the example.
6. Select **Create plan template**. You are returned to the **Plan template details** page for the new template.
We can now proceed to create a Product Plan for the example based on this template.
7. Select **Plans**:
The **Plans** page opens.
8. In the **Product** drop-down, select **Revive Graph Standard**.
9. Select **Create plan**. The **Create** page opens.
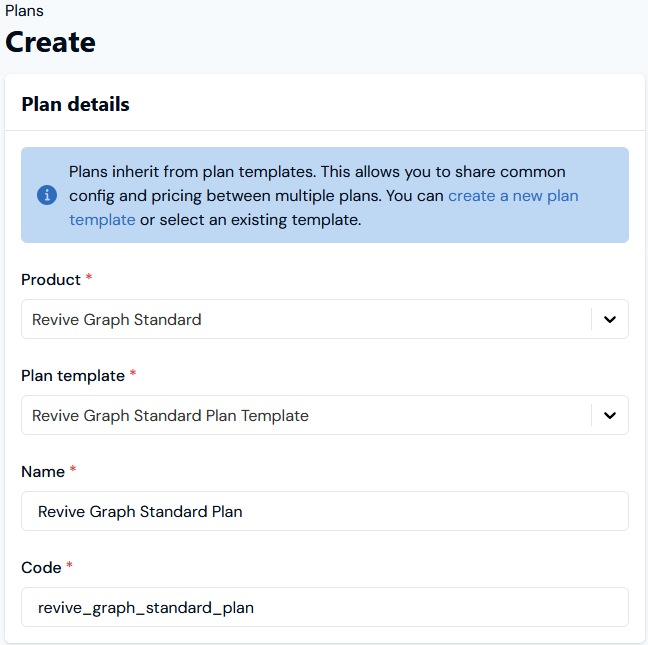
Here's the **Plan details** setup:
Note that we don't need to do any Plan template overrides for **Standing charge** or **Minimum spend** amounts we want to apply for the example - we configured the **Revive Graph Standard Template** for the required **Standing charge** amount of \$20 per month, and our new **Revive Graph Standard** **Plan** will inherit this setting from the template.
10. Select **Create plan**. You are returned to the **Plan details** page.
In the next step, we can price this Plan using our Aggregations.
> **More Details:** [Reviewing Options for Plan Templates and Plans](/guides/plans-and-pricing/working-with-plan-templates-and-plans/reviewing-configuration-options-for-plans-and-plan-templates) and [Creating Plans](/guides/plans-and-pricing/working-with-plan-templates-and-plans/creating-plans)
## Step 5: Price Product Plan
*Pricing* allows you to configure the cost of usage data under a specific Plan you apply to an Account, and is used to calculate bills.
We can use the Pricing editor in the Console to quickly price up our Product Plan to meet the pricing requirements for the example.
**To price Product Plan:**
1. Select **Pricing**. The **Pricing** page opens.
2. Select **Pricing editor**:
The **Pricing editor** opens.
3. In the **Product** drop-down, select **Revive Graph Standard**.
4. Select **Add plans**. The **Select plans** dialog opens and lists all Plans created for the **Revive Graph Standard** Product.
5. Check **Revive Graph Standard Plan** and select **Confirm**:
* The dialog closes and the Plan is added to the **Pricing editor** page.
* A warning shows telling you: **No active pricing configured**.
We'll use the Aggregations we created at **Step 3** as usage-based metrics to price the Plan in accordance with the requirements set out in the example.
6. Click **Add aggregations**. A **Select aggregations** dialog appears and lists all Aggregations created for the **Revive Graph Standard** Product.
* Note that you might also see *global* Aggregations listed for selection. Global Aggregations are not tied to any specific Product and can be used to price Plans across all Products.
7. On the dialog check our three Aggregations:
* **GigaByte Store Aggregation**
* **Graphic File Submits Aggregation**
* **Processing Average Aggregation**
8. Click **Confirm**. The dialog closes and the selected Aggregations are added to the **Pricing editor** for the added Plan. You'll see **No** **active pricing configured** warnings for the Plan for each of the selected Aggregations.
9. In the pricing grid, select **Create plan pricing** for the **GigaByte Stored Aggregation**. The **Create** pricing page opens:
* You can read off details of the Aggregation being used to create the pricing at the top of the page.
* You can **Switch to wizard** if you want and follow an alternative streamlined pricing workflow by **Pricing type** selection. For the example workflow, we'll continue with the default **Advanced** pricing workflow format.
10. Work down the form to enter:
* **Pricing details**:
* **Start** and **End** date/times for the period the pricing will be active for the Plan.
* A **Description** that will appear for any usage charge line items on Bills, such as **Storage Charges**.
* **Minimum spend settings**:
* Ignore these settings - there was no requirement for the example to impose minimum spend amounts for billing.
* **Pricing settings**:
* Leave the **Usage accumulates over the entire plan contract period** switch in the default position of disabled.
* Leave the **Apply as** setting as the default - **Debit**.
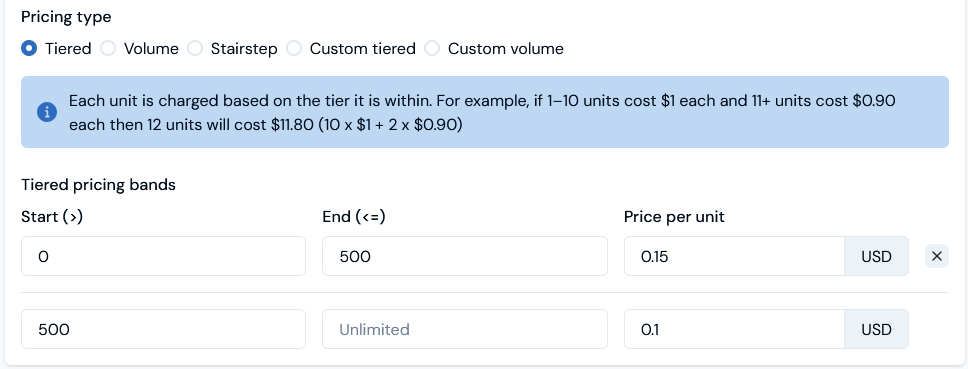
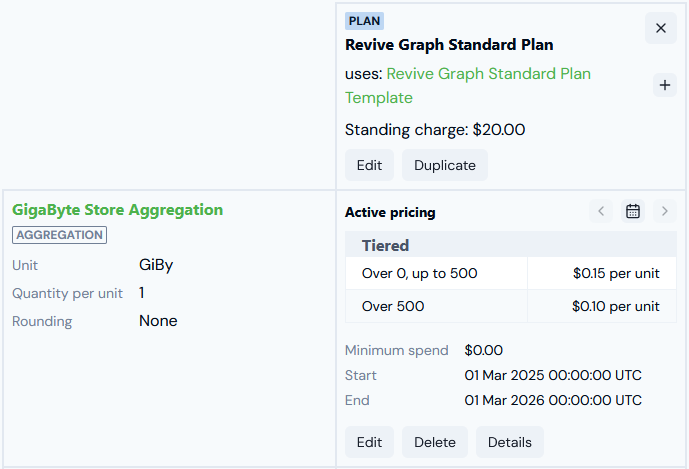
* **Pricing type**: The pricing requirement was to charge by cumulative volume of corrupted files submitted for storage and cleanup in the month measured in gigabytes - charge rate is \$0.15 per GB for the first 500GB; \$0.10 per GB thereafter. We can implement this pricing, using a **Tiered** pricing structure with two pricing bands configured:
11. Select **Create pricing**. The **Create** pricing page closes and the pricing using the Aggregation is shown as active in the pricing grid:
12. Repeat steps **9.** to **11.**, using the other two Aggregations we created for pricing the Plan, and use a suitable pricing type and structure for each pricing:
* **Graphic File Submits Aggregation**. The pricing requirement was to charge by count of the number of corrupted files submitted for storage and cleanup in the month, charged at \$0.50 per file. We can use a **Tiered** structure with a single pricing band without limit to impose this flat rate pricing:
* **Processing Average**. The pricing requirement was to charge by an add-on amount each month based on maximum average clean up processing time required per submitted files: charged at \$12 for up to 4 seconds average processing; \$25 for up to 6 seconds average processing; \$50 for anything above 6 seconds average processing. We can use a **Stairstep** pricing type to impose this pricing:
13. When you have saved the further two pricings, each will also show as **Active Pricing** for the Plan in the grid:
We now have a Product Plan priced according to the pricing requirements.
> **More Details:** [Reviewing Pricing Options for Plans and Plan Templates](/guides/plans-and-pricing/pricing-plans/reviewing-pricing-options-and-pricing-plans) and [Pricing Plans and Plan Templates](/guides/plans-and-pricing/pricing-plans/pricing-plans).
## Step 6: Create Test Account and Attach Priced Plan
*Accounts* represent one of your end-customers, and contain an end-customer's name and contact details:
* When you attach a priced Plan to an Account, this creates a link between them to create an *Account Plan*. An Account Plan determines the charges incurred by customers who consume the Product the Plan is priced for.
For this step, we'll create a test Account for the example and attach our priced Plan to it.
**To create a test Account and attach Plan:**
1. In the main Console navigation, select **Accounts**. The **Accounts** page opens.
2. Select **Create account**. The **Create** page opens.
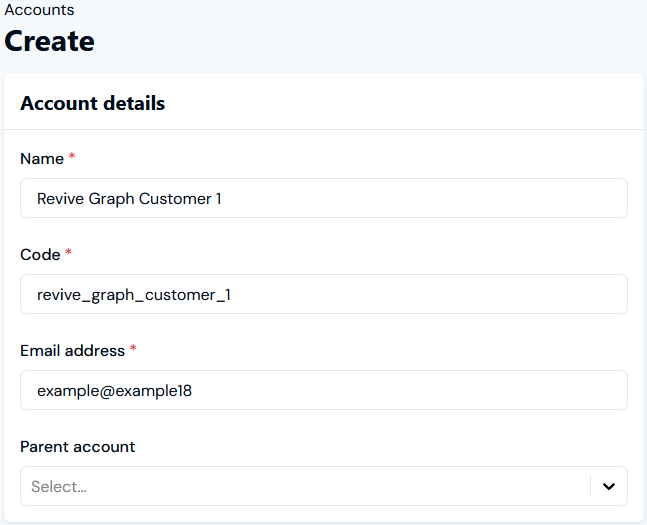
3. Enter the **Account details**:
* **Name** and **Code**. Required fields.
* Note that when you enter a **Name** and click in the **Code** field, a default code is entered based on the name you've entered, which you can then edit as required.
* **Email Address**. In addition to **Name** and **Code**, this is also a required field:
* **Other settings?** For the current example, we can leave the other settings at their defaults:
* **Address**
* **Bill settings**
* **Bill statements**
4. Select **Create account.** You are returned to the **Account details** page with the **Overview** tab selected.
For the worked example, we've created the **Revive Graph Customer 1** test Account.
5. Select the **Attached plans** tab.
6. On the **Active and pending attached plans** panel, select **Create plan** **attachment**. The **Create** page opens.
When you attach a Plan to an Account, you create an *Account Plan*, which lets you define the specific way in which you want the Plan to be applied to the individual Account. Note that the Account Plan you create when you attach the Plan to an Account *is distinct from* the Plan itself - you may want to attach the Plan to another Account but to configure the way the Plan is applied to that other Account differently.
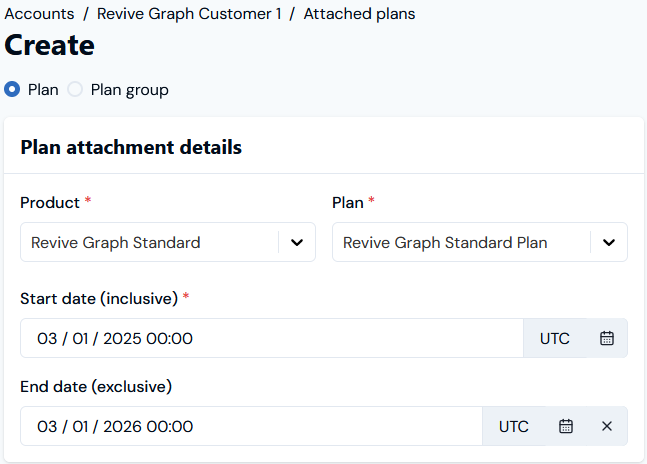
7. On the **Create** page, leave the radio button for **Plan** as default setting and enter the **Plan attachment details**:
* Use the **Product** drop-down to select the Product, which is **Revive Graph Standard** for the example. (*Required*) The **Plan** drop-down is enabled.
* Use the **Plan** drop-down to select the Plan, which is **Revive Graph Standard Plan** for the example. (*Required*)
* Use the pop-up calendars to enter **Start date** (*Required*) and **End date** (*Optional*), which will define the period the Account Plan is active for the Account.
* **Plan attachment settings?** For the current example, we can leave the other settings at their defaults
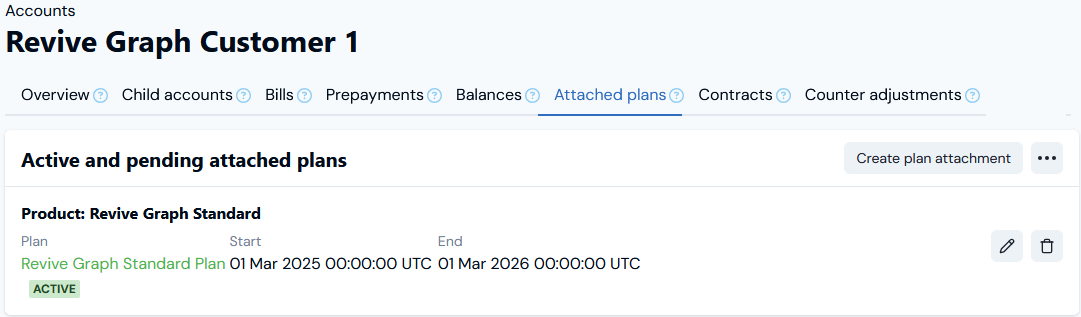
8. Select **Create plan attachment**. On the **Attached plans** tab, the Account Plan is shown on the **Active and pending attached plans** panel:
We now have a **Revive Graph Customer 1** test Account set up that will be billed according to the pricing schema we've configured for the **Revive Graph Standard Plan** for any metered usage of the Product by the Account.
> **More Details:** [Creating an Account](/guides/end-customer-accounts/creating-an-account) and [Attaching Plans to an Account](/guides/end-customer-accounts/attaching-plans-to-an-account)
## Step 7: Submit Data to Test Account and Check Bill
We'll now submit some test usage data to our test Account for the **Store N Clean Meter**, which will allow us to generate a Bill and check that the usage charges on the Bill for the submitted usage data are correct.
1. Select **Accounts**. On the **Accounts** page, select the **NAME** hotlink text of the **Revive Graph Customer 1** test Account we created at **Step 6**. The **Account details** page opens with the **Overview** tab selected.
2. Select **Submit usage**:
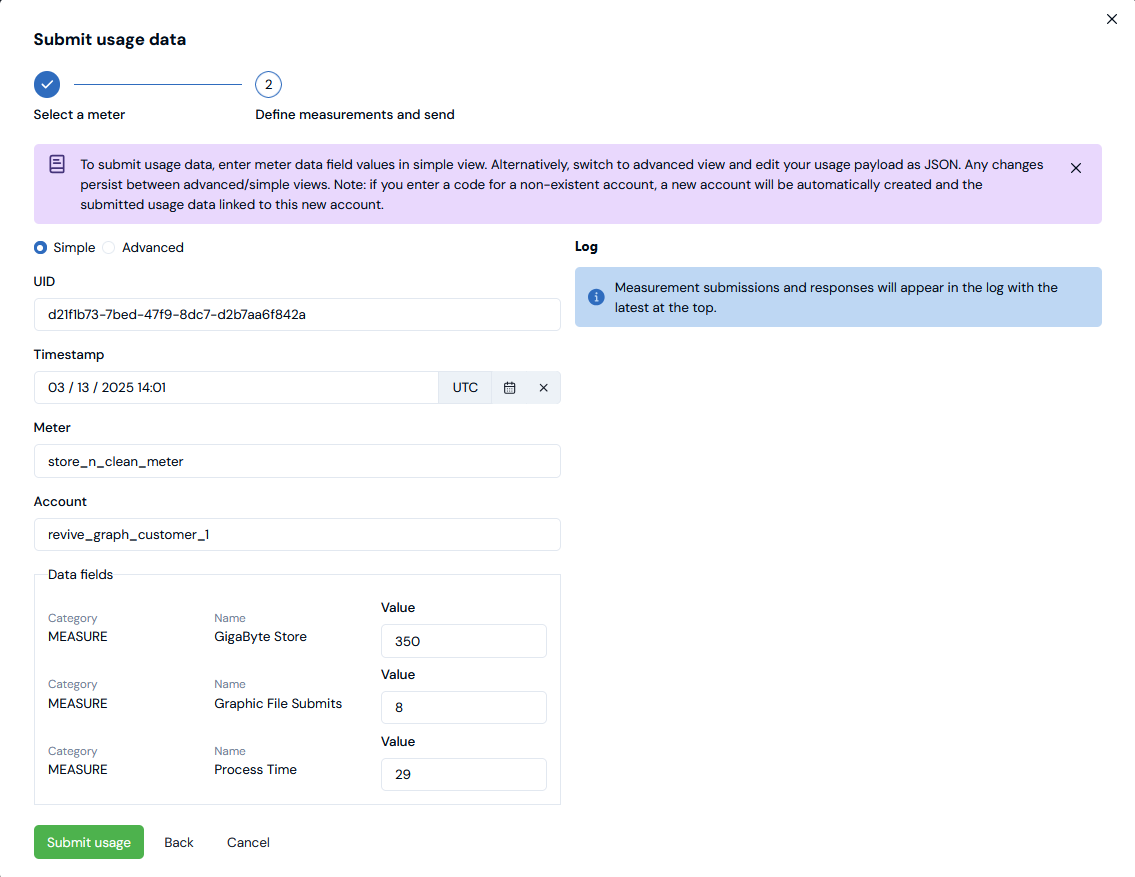
A **Submit usage data** dialog appears.
To submit usage data measurements for an Account, you must complete two stages using the dialog.
3. Under stage **1: Select a meter**, use the **Meter** drop-down to select the **Store N Clean** Meter and then select **Next**. The dialog adjusts to show stage **2: Define measurements and send:**
* Note that you can complete stage 2 using either a **Simple** or **Advanced** format, where the default is **Simple**.
* For the example, we'll use the **Simple** format to submit our test usage data measurements:
* **UID**. This field is automatically populated with a unique id for the measurement. For the example, we'll use this as our measurement id.
* **Timestamp**. The timestamp field is also automatically populated using the date/time the dialog was opened, and again for the example we'll use this as the timestamp for the measurement.
* **Meter**. The Meter **Code** is automatically entered.
* **Account**. The **Code** of the Account we're submitting the data measurement for is automatically entered.
* **Data fields**. The three Data Fields we set up for the Meter are shown with empty **Value** fields.
4. Enter some test data **Values** for each of the Data Fields:
* **GigaByte Store** = 350
* **Graphic File Submits** = 8
* **Process Time** = 29
**Tip: Record the Test Data Values!** Keep a record of the test **Values** you've submitted for each of the fields. You can then calculate manually what the respective charges should be when you generate a sample Bill for the Account.
5. Select **Submit usage**. If the measurement is ingested successfully, you'll see a `{"result" : "accepted"}` message under the **Log** section of the **Submit usage data** dialog.
6. For additional test data measurements, repeat steps **3.** to **5.** - for the example, we'll submit two more measurements:
* Second measurement **Values**:
* **GigaByte Store** = 650
* **Graphic File Submits** = 12
* **Process Time** = 53
* Third measurement **Values**:
* **GigaByte Store** = 550
* **Graphic File Submits** = 10
* **Process Time** = 42
7. On the **Account details** page, select the **Bills** tab.
8. On the **Bills** tab, select **Run billing**. The **Run billing** dialog appears.
9. In the example, we are using monthly billing and the test data was submitted in March 2025, so we select:
* April 1st 2025 for **Invoice date**.
* **Monthly** for **Bill Frequency**.
10. Select **Run billing**. The dialog closes and your Bill job is queued.
* You can select the **Running tasks** button at top-right in the Console. This opens the **Running tasks** panel and you can check the status of your Bill job:
11. When the Bill has generated, it will be listed on the **Bills** tab for the Account. Select the **Reference** hotlink text to open the Bill in **Bill management**.
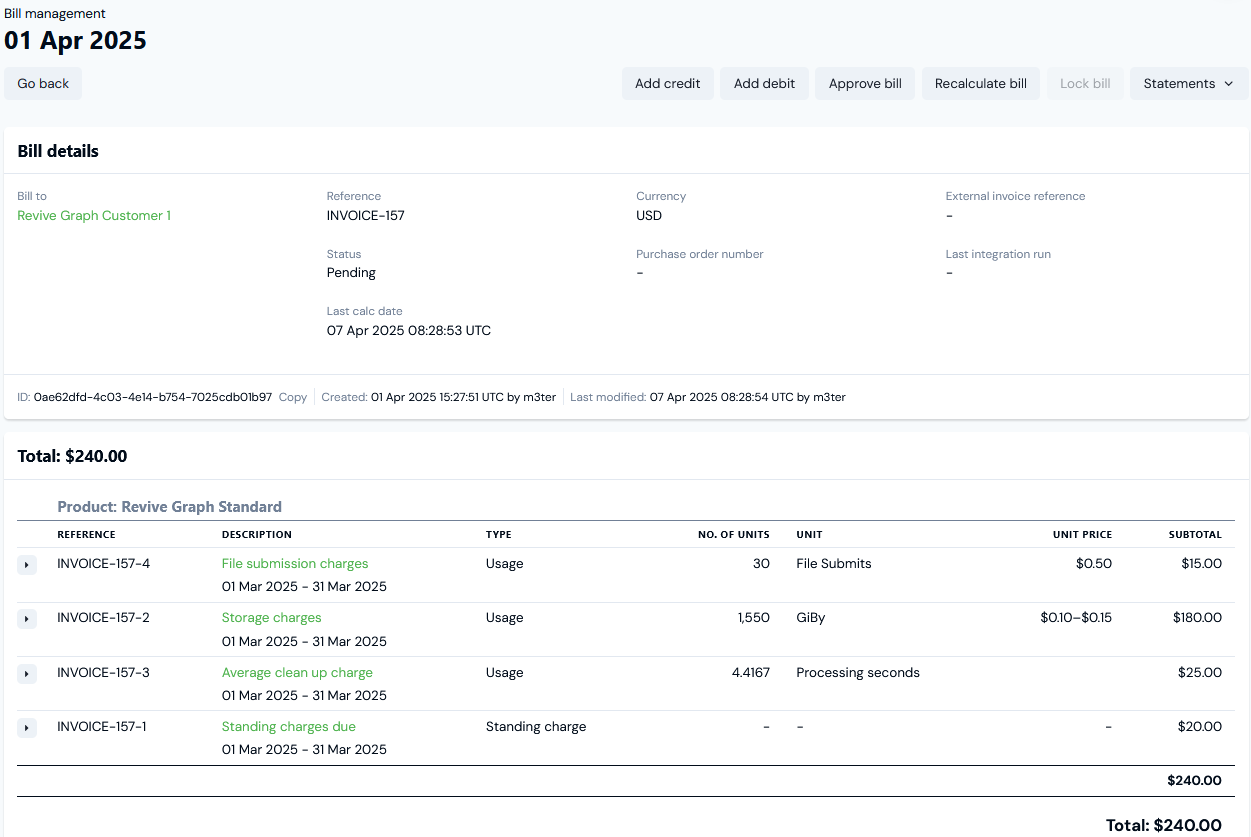
Before checking a sample Bill we've generated for the Account, we can calculate manually what the cumulative usage charges should be for each part of the usage-based pricing we've implemented:
* **GigaBytes Stored**. The total amounts to 350 + 650 + 550 = 1,550 GiBy. The tiered pricing structure we've set up means the charge for the first 500 at \$0.15 per GiBy = \$75 plus the charge for the remaining 1,050 at \$0.10 per GiBy = \$105. Total = \$180.
* **File Submits**. The total number of files submitted is 30. At the flat rate of \$0.50 per file, the charge = \$15.
* **Processing Average**. The maximum average processing time for the three data submissions results from the second submission, where 12 files were submitted and which required a total of 53 seconds processing time. The average processing time in this case is 53/12 = 4.4167 seconds. Because this is more than 4, charge = \$25.
The Bill for the Account should be the total of these three usage charges = \$220 plus the standing charge of \$20 per billing period, which amounts to an overall total = \$240.
For the example, we can see that the Bill based on test usage data we submitted has been calculated correctly in accordance with our usage-based pricing schema:
**Deploying to Production**: Having submitted some metered test data against a test Account, generated a Bill for the Account, and confirmed that charges are in accordance with our pricing requirements for consumption of our Product, we can be comfortable deploying our usage-based pricing implementation to live production.
> **More Details:** [Submitting Test Usage Data](/guides/billing-and-usage-data/submitting-usage-data/submitting-test-usage-data) and [Running Bills Manually](/guides/billing-and-usage-data/running-viewing-and-managing-bills/running-bills-and-viewing-bill-details#running-bills-manually)
 3. Select **Create product**.
The **Revive Graph Standard** Product can now serve as a container for any Meters, Aggregations, Pricing, Plans, and Plan Templates we'll need for the example.
> **More Details:** [Creating and Managing Products](/guides/creating-and-managing-products)
## Step 2: Set up Meter
*Meters* define the data fields that your system will use to submit usage date to the m3ter platform:
* As well as simple data fields, which collect raw usage data, you can define derived fields that reference and apply calculations to simple fields. For the example, we'll create three data fields and a single derived field to meet the pricing requirements.
* You can create Product-specific Meters or Global Meters. For the example, we'll create a single Meter for our example Product.
**To create a Meter:**
1. Select **Metering**. The **Meters** page opens.
2. In the **Product** drop-down, select **Revive Graph Standard**.
3. Select **Create meter**.
Here's the Meter set up to support the pricing model we want to use in the example:
* **Meter details**:
3. Select **Create product**.
The **Revive Graph Standard** Product can now serve as a container for any Meters, Aggregations, Pricing, Plans, and Plan Templates we'll need for the example.
> **More Details:** [Creating and Managing Products](/guides/creating-and-managing-products)
## Step 2: Set up Meter
*Meters* define the data fields that your system will use to submit usage date to the m3ter platform:
* As well as simple data fields, which collect raw usage data, you can define derived fields that reference and apply calculations to simple fields. For the example, we'll create three data fields and a single derived field to meet the pricing requirements.
* You can create Product-specific Meters or Global Meters. For the example, we'll create a single Meter for our example Product.
**To create a Meter:**
1. Select **Metering**. The **Meters** page opens.
2. In the **Product** drop-down, select **Revive Graph Standard**.
3. Select **Create meter**.
Here's the Meter set up to support the pricing model we want to use in the example:
* **Meter details**:
 * **Data fields**:
 * **Derived fields**:
 For the example, we've created the **Store N Clean Meter** and added the following fields to capture usage data:
* Three Data Fields of type **Measure**:
* **GigaByte Store** to collect quantitative data on the file storage volume in Gigabytes.
* **Graphic File Submits** to collect quantitative data on the number of files submitted.
* **Process Time** collect quantitative data on the total processing time required to clean files in seconds.
* One Derived Field of type **Measure**:
* **Processing Average** to reference two of the Data Fields and apply a calculation to derive the average processing time required per set of submitted files.
4. Select **Create meter**.
We now have a single Meter for the example, which we can use to collect usage data on any Account that consumes the **Revive Graph Standard** Product. This metered usage data will serve as the basis for the pricing metrics we want to apply to rate Product consumption.
> **More Details:** [Reviewing Meter Options](/guides/usage-data-meters/reviewing-meter-options) and [Creating Meters](/guides/usage-data-meters/creating-meters)
## Step 3: Define Aggregations
*Aggregations* define how to transform into a single number the individual measurements submitted to a Meter Data Field as usage data. For example, you may choose to simply SUM the submitted usage data values. In this way, Aggregations define the usage-based pricing metrics you'll use to set up pricing for your products and services.
For the usage-based pricing model we want to implement in our example, we'll need to create three Aggregations based on the usage data collected by our **Store N Clean Meter**. Each Aggregation will target a different Meter field to define a pricing metric:
* For cumulative volume of graphic files submitted for storage and cleanup, we'll target the **GigaByte Store** Data Field.
* For number of files submitted for storage and cleanup, we'll target the **Graphic File Submits** Data Field.
* For maximum average clean up processing time, we'll target the **Processing Average** Derived Field.
**To create an Aggregation:**
1. Select **Metering**. The **Meters** page opens.
2. Select **Aggregations**:
For the example, we've created the **Store N Clean Meter** and added the following fields to capture usage data:
* Three Data Fields of type **Measure**:
* **GigaByte Store** to collect quantitative data on the file storage volume in Gigabytes.
* **Graphic File Submits** to collect quantitative data on the number of files submitted.
* **Process Time** collect quantitative data on the total processing time required to clean files in seconds.
* One Derived Field of type **Measure**:
* **Processing Average** to reference two of the Data Fields and apply a calculation to derive the average processing time required per set of submitted files.
4. Select **Create meter**.
We now have a single Meter for the example, which we can use to collect usage data on any Account that consumes the **Revive Graph Standard** Product. This metered usage data will serve as the basis for the pricing metrics we want to apply to rate Product consumption.
> **More Details:** [Reviewing Meter Options](/guides/usage-data-meters/reviewing-meter-options) and [Creating Meters](/guides/usage-data-meters/creating-meters)
## Step 3: Define Aggregations
*Aggregations* define how to transform into a single number the individual measurements submitted to a Meter Data Field as usage data. For example, you may choose to simply SUM the submitted usage data values. In this way, Aggregations define the usage-based pricing metrics you'll use to set up pricing for your products and services.
For the usage-based pricing model we want to implement in our example, we'll need to create three Aggregations based on the usage data collected by our **Store N Clean Meter**. Each Aggregation will target a different Meter field to define a pricing metric:
* For cumulative volume of graphic files submitted for storage and cleanup, we'll target the **GigaByte Store** Data Field.
* For number of files submitted for storage and cleanup, we'll target the **Graphic File Submits** Data Field.
* For maximum average clean up processing time, we'll target the **Processing Average** Derived Field.
**To create an Aggregation:**
1. Select **Metering**. The **Meters** page opens.
2. Select **Aggregations**:
 3. In the **Product** drop-down, select **Revive Graph Standard**.
4. Select **Create aggregation**.
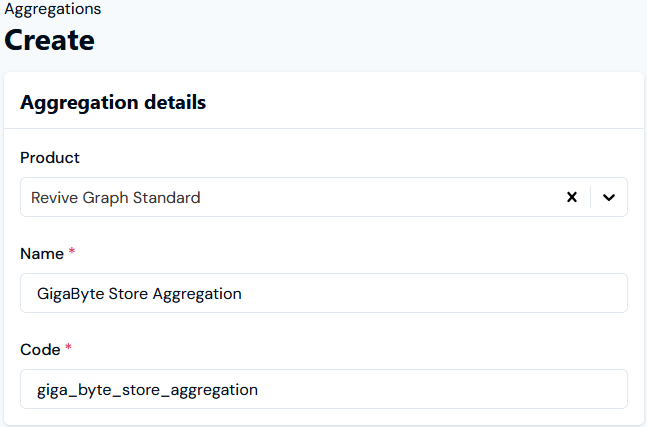
Here's the setup for the first Aggregation:
* **Aggregation details**:
3. In the **Product** drop-down, select **Revive Graph Standard**.
4. Select **Create aggregation**.
Here's the setup for the first Aggregation:
* **Aggregation details**:
 * **Meter settings**:
 * **Aggregation settings**:
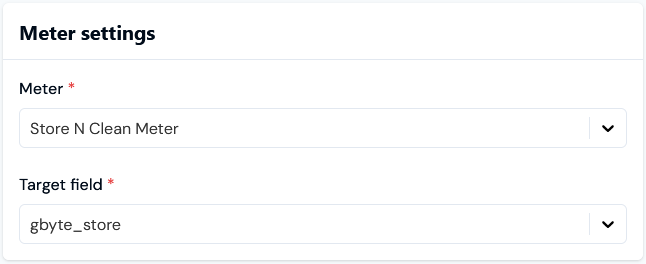
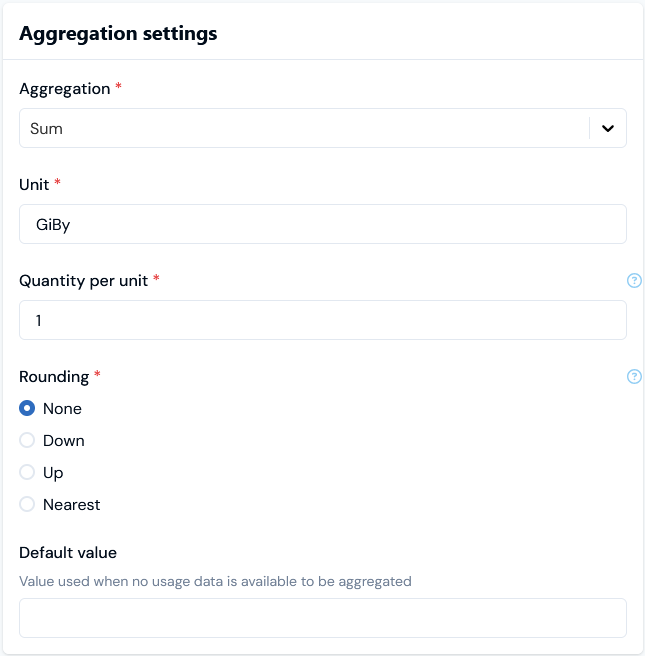 The **Gigabyte Store Aggregation** gives us our first pricing metric by:
* Targeting the **Gigabyte Store** field on the **Store N Clean Meter** and uses the **Sum** of the Gigabytes stored.
* We leave the **Quantity per unit** setting at **1**, since we'll configure a tiered pricing by the Gigabyte using this Aggregation.
5. Select **Create Aggregation**.
6. Repeat steps **4.** and **5.** to create another two Aggregations:
Here's the setup for the second Aggregation:
* **Aggregation details**:
The **Gigabyte Store Aggregation** gives us our first pricing metric by:
* Targeting the **Gigabyte Store** field on the **Store N Clean Meter** and uses the **Sum** of the Gigabytes stored.
* We leave the **Quantity per unit** setting at **1**, since we'll configure a tiered pricing by the Gigabyte using this Aggregation.
5. Select **Create Aggregation**.
6. Repeat steps **4.** and **5.** to create another two Aggregations:
Here's the setup for the second Aggregation:
* **Aggregation details**:
 * **Meter settings**:
 * **Aggregation settings**:
 The **Graphic File Submits Aggregation** gives us our second pricing metric by:
* Targeting the **Graphic File Submits** field on the **Store N Clean Meter** and uses a **Sum** of file submissions.
* We leave the **Quantity per unit** setting at **1**, since we'll configure a flat rate pricing by file submissions using this Aggregation.
Here's the setup for the third Aggregation:
* **Aggregation details**:
The **Graphic File Submits Aggregation** gives us our second pricing metric by:
* Targeting the **Graphic File Submits** field on the **Store N Clean Meter** and uses a **Sum** of file submissions.
* We leave the **Quantity per unit** setting at **1**, since we'll configure a flat rate pricing by file submissions using this Aggregation.
Here's the setup for the third Aggregation:
* **Aggregation details**:
 * **Meter settings**:
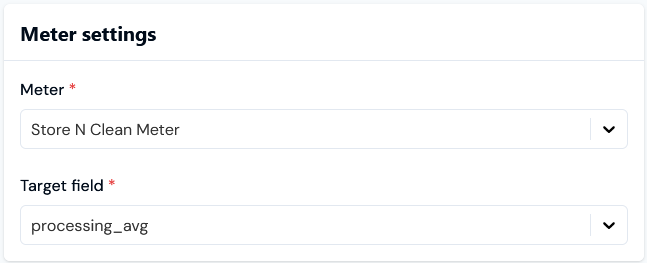 * **Aggregation settings**:
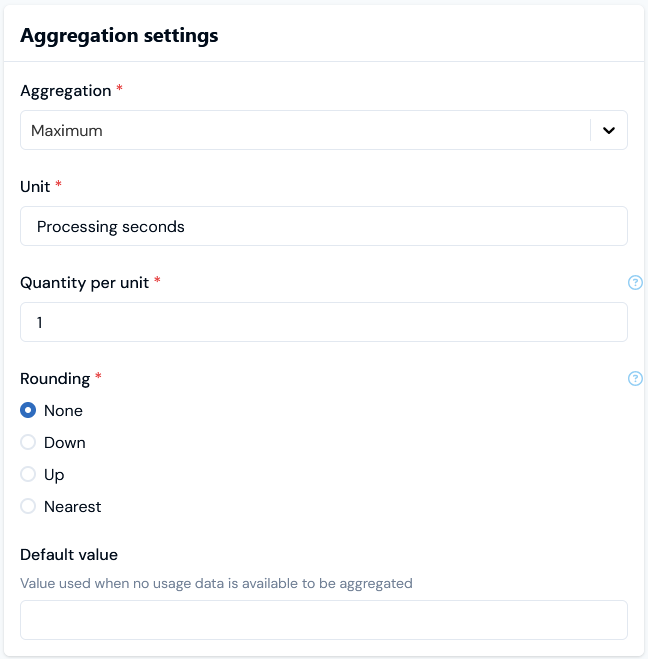 The **Processing Average Aggregation** gives us our third pricing metric by:
* Targeting the **Processing Average** derived field on the **Store N Clean Meter** and uses the **Maximum** value resulting from the calculation built into the field.
* We leave the **Quantity per unit** setting at **1**, since we'll configure a tiered pricing by number of seconds using this Aggregation.
> **More Details:** [Reviewing Aggregation Options](/guides/usage-data-aggregations/reviewing-aggregation-options) and [Creating Aggregations](/guides/usage-data-aggregations/creating-aggregations)
## Step 4: Create Product Plan
*Plans* represent a pricing plan for one of your products or services. A Plan is always derived from a Plan Template and inherits settings from the Plan Template which control billing operations, such as billing frequency and currency. You can override some of these settings when you create a Plan from a Plan Template. To meet the example requirements:
* First, we'll need a Plan Template for the **Revive Graph Standard** Product. We'll configure the Plan Template:
* For monthly billing using a specific billing currency.
* To include for a Standing charge to be applied for each billing period.
* Second, we can then create a Product Plan based on the Plan Template. The Plan will then inherit the monthly billing frequency and Standing charge billing amount from the Plan Template.
**To create a Product Plan Template:**
1. Select **Pricing**. The **Plans** page opens.
2. Select **Plan templates**:
The **Processing Average Aggregation** gives us our third pricing metric by:
* Targeting the **Processing Average** derived field on the **Store N Clean Meter** and uses the **Maximum** value resulting from the calculation built into the field.
* We leave the **Quantity per unit** setting at **1**, since we'll configure a tiered pricing by number of seconds using this Aggregation.
> **More Details:** [Reviewing Aggregation Options](/guides/usage-data-aggregations/reviewing-aggregation-options) and [Creating Aggregations](/guides/usage-data-aggregations/creating-aggregations)
## Step 4: Create Product Plan
*Plans* represent a pricing plan for one of your products or services. A Plan is always derived from a Plan Template and inherits settings from the Plan Template which control billing operations, such as billing frequency and currency. You can override some of these settings when you create a Plan from a Plan Template. To meet the example requirements:
* First, we'll need a Plan Template for the **Revive Graph Standard** Product. We'll configure the Plan Template:
* For monthly billing using a specific billing currency.
* To include for a Standing charge to be applied for each billing period.
* Second, we can then create a Product Plan based on the Plan Template. The Plan will then inherit the monthly billing frequency and Standing charge billing amount from the Plan Template.
**To create a Product Plan Template:**
1. Select **Pricing**. The **Plans** page opens.
2. Select **Plan templates**:
 The **Plan templates** page opens.
3. In the **Product** drop-down, select **Revive Graph Standard**.
4. Select **Create plan template**. The **Create** page opens.
Here's the setup for the **Plan template details**:
The **Plan templates** page opens.
3. In the **Product** drop-down, select **Revive Graph Standard**.
4. Select **Create plan template**. The **Create** page opens.
Here's the setup for the **Plan template details**:
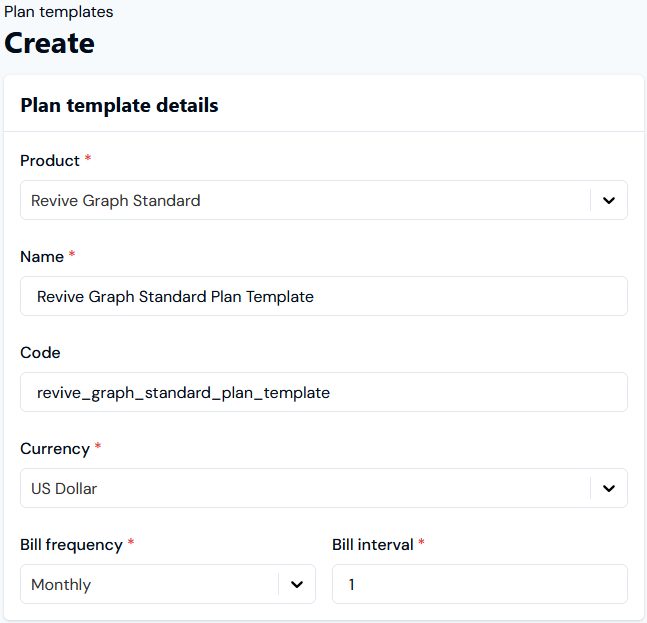 For the **Revive Graph Standard Plan Template** we've:
* Chosen **US dollars** as the billing currency.
* Selected a monthly **Bill frequency** with a **Bill interval** of **1**, which means Accounts put on the Plan will receive a Bill each month for a month's period of usage.
5. Configure the settings for **Standing charge** and **Minimum spend** amounts:
* **Standing charge** settings:
* Set a **Standing charge** of **\$20** per month as required for the example.
* For **Standing charge billing**, leave **Use organization-wide configuration** checked for **(In arrears)**.
* Set **Standing charge interval** at **1** to charge this amount on every monthly Bill.
* Set **Standing charge offset** at **0** to apply this charge from the first Bill.
* Enter a **Standing charge description** if you wish - this will show against the Standing charge line items on customer Bills.
For the **Revive Graph Standard Plan Template** we've:
* Chosen **US dollars** as the billing currency.
* Selected a monthly **Bill frequency** with a **Bill interval** of **1**, which means Accounts put on the Plan will receive a Bill each month for a month's period of usage.
5. Configure the settings for **Standing charge** and **Minimum spend** amounts:
* **Standing charge** settings:
* Set a **Standing charge** of **\$20** per month as required for the example.
* For **Standing charge billing**, leave **Use organization-wide configuration** checked for **(In arrears)**.
* Set **Standing charge interval** at **1** to charge this amount on every monthly Bill.
* Set **Standing charge offset** at **0** to apply this charge from the first Bill.
* Enter a **Standing charge description** if you wish - this will show against the Standing charge line items on customer Bills.
 * **Minimum spend** settings:
* Omit a **Product minimum spend** per billing period, since this is not required for the example.
6. Select **Create plan template**. You are returned to the **Plan template details** page for the new template.
We can now proceed to create a Product Plan for the example based on this template.
7. Select **Plans**:
* **Minimum spend** settings:
* Omit a **Product minimum spend** per billing period, since this is not required for the example.
6. Select **Create plan template**. You are returned to the **Plan template details** page for the new template.
We can now proceed to create a Product Plan for the example based on this template.
7. Select **Plans**:
 The **Plans** page opens.
8. In the **Product** drop-down, select **Revive Graph Standard**.
9. Select **Create plan**. The **Create** page opens.
Here's the **Plan details** setup:
The **Plans** page opens.
8. In the **Product** drop-down, select **Revive Graph Standard**.
9. Select **Create plan**. The **Create** page opens.
Here's the **Plan details** setup:
 Note that we don't need to do any Plan template overrides for **Standing charge** or **Minimum spend** amounts we want to apply for the example - we configured the **Revive Graph Standard Template** for the required **Standing charge** amount of \$20 per month, and our new **Revive Graph Standard** **Plan** will inherit this setting from the template.
10. Select **Create plan**. You are returned to the **Plan details** page.
In the next step, we can price this Plan using our Aggregations.
> **More Details:** [Reviewing Options for Plan Templates and Plans](/guides/plans-and-pricing/working-with-plan-templates-and-plans/reviewing-configuration-options-for-plans-and-plan-templates) and [Creating Plans](/guides/plans-and-pricing/working-with-plan-templates-and-plans/creating-plans)
## Step 5: Price Product Plan
*Pricing* allows you to configure the cost of usage data under a specific Plan you apply to an Account, and is used to calculate bills.
We can use the Pricing editor in the Console to quickly price up our Product Plan to meet the pricing requirements for the example.
**To price Product Plan:**
1. Select **Pricing**. The **Pricing** page opens.
2. Select **Pricing editor**:
Note that we don't need to do any Plan template overrides for **Standing charge** or **Minimum spend** amounts we want to apply for the example - we configured the **Revive Graph Standard Template** for the required **Standing charge** amount of \$20 per month, and our new **Revive Graph Standard** **Plan** will inherit this setting from the template.
10. Select **Create plan**. You are returned to the **Plan details** page.
In the next step, we can price this Plan using our Aggregations.
> **More Details:** [Reviewing Options for Plan Templates and Plans](/guides/plans-and-pricing/working-with-plan-templates-and-plans/reviewing-configuration-options-for-plans-and-plan-templates) and [Creating Plans](/guides/plans-and-pricing/working-with-plan-templates-and-plans/creating-plans)
## Step 5: Price Product Plan
*Pricing* allows you to configure the cost of usage data under a specific Plan you apply to an Account, and is used to calculate bills.
We can use the Pricing editor in the Console to quickly price up our Product Plan to meet the pricing requirements for the example.
**To price Product Plan:**
1. Select **Pricing**. The **Pricing** page opens.
2. Select **Pricing editor**:
 The **Pricing editor** opens.
3. In the **Product** drop-down, select **Revive Graph Standard**.
4. Select **Add plans**. The **Select plans** dialog opens and lists all Plans created for the **Revive Graph Standard** Product.
5. Check **Revive Graph Standard Plan** and select **Confirm**:
* The dialog closes and the Plan is added to the **Pricing editor** page.
* A warning shows telling you: **No active pricing configured**.
We'll use the Aggregations we created at **Step 3** as usage-based metrics to price the Plan in accordance with the requirements set out in the example.
6. Click **Add aggregations**. A **Select aggregations** dialog appears and lists all Aggregations created for the **Revive Graph Standard** Product.
* Note that you might also see *global* Aggregations listed for selection. Global Aggregations are not tied to any specific Product and can be used to price Plans across all Products.
7. On the dialog check our three Aggregations:
* **GigaByte Store Aggregation**
* **Graphic File Submits Aggregation**
* **Processing Average Aggregation**
8. Click **Confirm**. The dialog closes and the selected Aggregations are added to the **Pricing editor** for the added Plan. You'll see **No** **active pricing configured** warnings for the Plan for each of the selected Aggregations.
9. In the pricing grid, select **Create plan pricing** for the **GigaByte Stored Aggregation**. The **Create** pricing page opens:
* You can read off details of the Aggregation being used to create the pricing at the top of the page.
* You can **Switch to wizard** if you want and follow an alternative streamlined pricing workflow by **Pricing type** selection. For the example workflow, we'll continue with the default **Advanced** pricing workflow format.
10. Work down the form to enter:
* **Pricing details**:
* **Start** and **End** date/times for the period the pricing will be active for the Plan.
* A **Description** that will appear for any usage charge line items on Bills, such as **Storage Charges**.
* **Minimum spend settings**:
* Ignore these settings - there was no requirement for the example to impose minimum spend amounts for billing.
* **Pricing settings**:
* Leave the **Usage accumulates over the entire plan contract period** switch in the default position of disabled.
* Leave the **Apply as** setting as the default - **Debit**.
* **Pricing type**: The pricing requirement was to charge by cumulative volume of corrupted files submitted for storage and cleanup in the month measured in gigabytes - charge rate is \$0.15 per GB for the first 500GB; \$0.10 per GB thereafter. We can implement this pricing, using a **Tiered** pricing structure with two pricing bands configured:
The **Pricing editor** opens.
3. In the **Product** drop-down, select **Revive Graph Standard**.
4. Select **Add plans**. The **Select plans** dialog opens and lists all Plans created for the **Revive Graph Standard** Product.
5. Check **Revive Graph Standard Plan** and select **Confirm**:
* The dialog closes and the Plan is added to the **Pricing editor** page.
* A warning shows telling you: **No active pricing configured**.
We'll use the Aggregations we created at **Step 3** as usage-based metrics to price the Plan in accordance with the requirements set out in the example.
6. Click **Add aggregations**. A **Select aggregations** dialog appears and lists all Aggregations created for the **Revive Graph Standard** Product.
* Note that you might also see *global* Aggregations listed for selection. Global Aggregations are not tied to any specific Product and can be used to price Plans across all Products.
7. On the dialog check our three Aggregations:
* **GigaByte Store Aggregation**
* **Graphic File Submits Aggregation**
* **Processing Average Aggregation**
8. Click **Confirm**. The dialog closes and the selected Aggregations are added to the **Pricing editor** for the added Plan. You'll see **No** **active pricing configured** warnings for the Plan for each of the selected Aggregations.
9. In the pricing grid, select **Create plan pricing** for the **GigaByte Stored Aggregation**. The **Create** pricing page opens:
* You can read off details of the Aggregation being used to create the pricing at the top of the page.
* You can **Switch to wizard** if you want and follow an alternative streamlined pricing workflow by **Pricing type** selection. For the example workflow, we'll continue with the default **Advanced** pricing workflow format.
10. Work down the form to enter:
* **Pricing details**:
* **Start** and **End** date/times for the period the pricing will be active for the Plan.
* A **Description** that will appear for any usage charge line items on Bills, such as **Storage Charges**.
* **Minimum spend settings**:
* Ignore these settings - there was no requirement for the example to impose minimum spend amounts for billing.
* **Pricing settings**:
* Leave the **Usage accumulates over the entire plan contract period** switch in the default position of disabled.
* Leave the **Apply as** setting as the default - **Debit**.
* **Pricing type**: The pricing requirement was to charge by cumulative volume of corrupted files submitted for storage and cleanup in the month measured in gigabytes - charge rate is \$0.15 per GB for the first 500GB; \$0.10 per GB thereafter. We can implement this pricing, using a **Tiered** pricing structure with two pricing bands configured:
 11. Select **Create pricing**. The **Create** pricing page closes and the pricing using the Aggregation is shown as active in the pricing grid:
 12. Repeat steps **9.** to **11.**, using the other two Aggregations we created for pricing the Plan, and use a suitable pricing type and structure for each pricing:
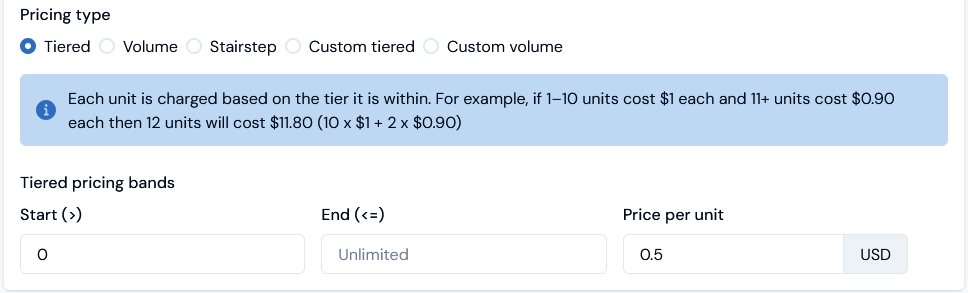
* **Graphic File Submits Aggregation**. The pricing requirement was to charge by count of the number of corrupted files submitted for storage and cleanup in the month, charged at \$0.50 per file. We can use a **Tiered** structure with a single pricing band without limit to impose this flat rate pricing:
12. Repeat steps **9.** to **11.**, using the other two Aggregations we created for pricing the Plan, and use a suitable pricing type and structure for each pricing:
* **Graphic File Submits Aggregation**. The pricing requirement was to charge by count of the number of corrupted files submitted for storage and cleanup in the month, charged at \$0.50 per file. We can use a **Tiered** structure with a single pricing band without limit to impose this flat rate pricing:
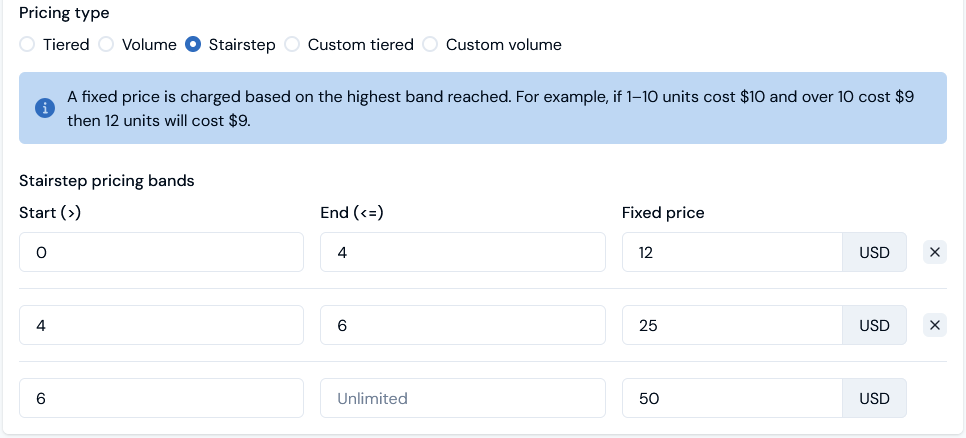
 * **Processing Average**. The pricing requirement was to charge by an add-on amount each month based on maximum average clean up processing time required per submitted files: charged at \$12 for up to 4 seconds average processing; \$25 for up to 6 seconds average processing; \$50 for anything above 6 seconds average processing. We can use a **Stairstep** pricing type to impose this pricing:
 13. When you have saved the further two pricings, each will also show as **Active Pricing** for the Plan in the grid:
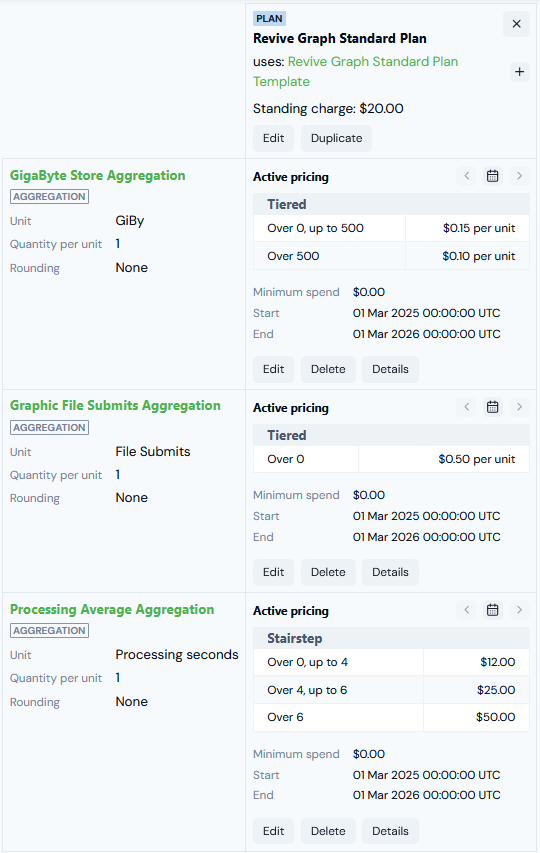 We now have a Product Plan priced according to the pricing requirements.
> **More Details:** [Reviewing Pricing Options for Plans and Plan Templates](/guides/plans-and-pricing/pricing-plans/reviewing-pricing-options-and-pricing-plans) and [Pricing Plans and Plan Templates](/guides/plans-and-pricing/pricing-plans/pricing-plans).
## Step 6: Create Test Account and Attach Priced Plan
*Accounts* represent one of your end-customers, and contain an end-customer's name and contact details:
* When you attach a priced Plan to an Account, this creates a link between them to create an *Account Plan*. An Account Plan determines the charges incurred by customers who consume the Product the Plan is priced for.
For this step, we'll create a test Account for the example and attach our priced Plan to it.
**To create a test Account and attach Plan:**
1. In the main Console navigation, select **Accounts**. The **Accounts** page opens.
2. Select **Create account**. The **Create** page opens.
3. Enter the **Account details**:
* **Name** and **Code**. Required fields.
* Note that when you enter a **Name** and click in the **Code** field, a default code is entered based on the name you've entered, which you can then edit as required.
* **Email Address**. In addition to **Name** and **Code**, this is also a required field:
We now have a Product Plan priced according to the pricing requirements.
> **More Details:** [Reviewing Pricing Options for Plans and Plan Templates](/guides/plans-and-pricing/pricing-plans/reviewing-pricing-options-and-pricing-plans) and [Pricing Plans and Plan Templates](/guides/plans-and-pricing/pricing-plans/pricing-plans).
## Step 6: Create Test Account and Attach Priced Plan
*Accounts* represent one of your end-customers, and contain an end-customer's name and contact details:
* When you attach a priced Plan to an Account, this creates a link between them to create an *Account Plan*. An Account Plan determines the charges incurred by customers who consume the Product the Plan is priced for.
For this step, we'll create a test Account for the example and attach our priced Plan to it.
**To create a test Account and attach Plan:**
1. In the main Console navigation, select **Accounts**. The **Accounts** page opens.
2. Select **Create account**. The **Create** page opens.
3. Enter the **Account details**:
* **Name** and **Code**. Required fields.
* Note that when you enter a **Name** and click in the **Code** field, a default code is entered based on the name you've entered, which you can then edit as required.
* **Email Address**. In addition to **Name** and **Code**, this is also a required field:
 * **Other settings?** For the current example, we can leave the other settings at their defaults:
* **Address**
* **Bill settings**
* **Bill statements**
4. Select **Create account.** You are returned to the **Account details** page with the **Overview** tab selected.
For the worked example, we've created the **Revive Graph Customer 1** test Account.
5. Select the **Attached plans** tab.
6. On the **Active and pending attached plans** panel, select **Create plan** **attachment**. The **Create** page opens.
When you attach a Plan to an Account, you create an *Account Plan*, which lets you define the specific way in which you want the Plan to be applied to the individual Account. Note that the Account Plan you create when you attach the Plan to an Account *is distinct from* the Plan itself - you may want to attach the Plan to another Account but to configure the way the Plan is applied to that other Account differently.
7. On the **Create** page, leave the radio button for **Plan** as default setting and enter the **Plan attachment details**:
* Use the **Product** drop-down to select the Product, which is **Revive Graph Standard** for the example. (*Required*) The **Plan** drop-down is enabled.
* Use the **Plan** drop-down to select the Plan, which is **Revive Graph Standard Plan** for the example. (*Required*)
* Use the pop-up calendars to enter **Start date** (*Required*) and **End date** (*Optional*), which will define the period the Account Plan is active for the Account.
* **Other settings?** For the current example, we can leave the other settings at their defaults:
* **Address**
* **Bill settings**
* **Bill statements**
4. Select **Create account.** You are returned to the **Account details** page with the **Overview** tab selected.
For the worked example, we've created the **Revive Graph Customer 1** test Account.
5. Select the **Attached plans** tab.
6. On the **Active and pending attached plans** panel, select **Create plan** **attachment**. The **Create** page opens.
When you attach a Plan to an Account, you create an *Account Plan*, which lets you define the specific way in which you want the Plan to be applied to the individual Account. Note that the Account Plan you create when you attach the Plan to an Account *is distinct from* the Plan itself - you may want to attach the Plan to another Account but to configure the way the Plan is applied to that other Account differently.
7. On the **Create** page, leave the radio button for **Plan** as default setting and enter the **Plan attachment details**:
* Use the **Product** drop-down to select the Product, which is **Revive Graph Standard** for the example. (*Required*) The **Plan** drop-down is enabled.
* Use the **Plan** drop-down to select the Plan, which is **Revive Graph Standard Plan** for the example. (*Required*)
* Use the pop-up calendars to enter **Start date** (*Required*) and **End date** (*Optional*), which will define the period the Account Plan is active for the Account.
 * **Plan attachment settings?** For the current example, we can leave the other settings at their defaults
8. Select **Create plan attachment**. On the **Attached plans** tab, the Account Plan is shown on the **Active and pending attached plans** panel:
* **Plan attachment settings?** For the current example, we can leave the other settings at their defaults
8. Select **Create plan attachment**. On the **Attached plans** tab, the Account Plan is shown on the **Active and pending attached plans** panel:
 We now have a **Revive Graph Customer 1** test Account set up that will be billed according to the pricing schema we've configured for the **Revive Graph Standard Plan** for any metered usage of the Product by the Account.
> **More Details:** [Creating an Account](/guides/end-customer-accounts/creating-an-account) and [Attaching Plans to an Account](/guides/end-customer-accounts/attaching-plans-to-an-account)
## Step 7: Submit Data to Test Account and Check Bill
We'll now submit some test usage data to our test Account for the **Store N Clean Meter**, which will allow us to generate a Bill and check that the usage charges on the Bill for the submitted usage data are correct.
1. Select **Accounts**. On the **Accounts** page, select the **NAME** hotlink text of the **Revive Graph Customer 1** test Account we created at **Step 6**. The **Account details** page opens with the **Overview** tab selected.
2. Select **Submit usage**:
We now have a **Revive Graph Customer 1** test Account set up that will be billed according to the pricing schema we've configured for the **Revive Graph Standard Plan** for any metered usage of the Product by the Account.
> **More Details:** [Creating an Account](/guides/end-customer-accounts/creating-an-account) and [Attaching Plans to an Account](/guides/end-customer-accounts/attaching-plans-to-an-account)
## Step 7: Submit Data to Test Account and Check Bill
We'll now submit some test usage data to our test Account for the **Store N Clean Meter**, which will allow us to generate a Bill and check that the usage charges on the Bill for the submitted usage data are correct.
1. Select **Accounts**. On the **Accounts** page, select the **NAME** hotlink text of the **Revive Graph Customer 1** test Account we created at **Step 6**. The **Account details** page opens with the **Overview** tab selected.
2. Select **Submit usage**:
 A **Submit usage data** dialog appears.
To submit usage data measurements for an Account, you must complete two stages using the dialog.
3. Under stage **1: Select a meter**, use the **Meter** drop-down to select the **Store N Clean** Meter and then select **Next**. The dialog adjusts to show stage **2: Define measurements and send:**
* Note that you can complete stage 2 using either a **Simple** or **Advanced** format, where the default is **Simple**.
* For the example, we'll use the **Simple** format to submit our test usage data measurements:
* **UID**. This field is automatically populated with a unique id for the measurement. For the example, we'll use this as our measurement id.
* **Timestamp**. The timestamp field is also automatically populated using the date/time the dialog was opened, and again for the example we'll use this as the timestamp for the measurement.
* **Meter**. The Meter **Code** is automatically entered.
* **Account**. The **Code** of the Account we're submitting the data measurement for is automatically entered.
* **Data fields**. The three Data Fields we set up for the Meter are shown with empty **Value** fields.
4. Enter some test data **Values** for each of the Data Fields:
* **GigaByte Store** = 350
* **Graphic File Submits** = 8
* **Process Time** = 29
A **Submit usage data** dialog appears.
To submit usage data measurements for an Account, you must complete two stages using the dialog.
3. Under stage **1: Select a meter**, use the **Meter** drop-down to select the **Store N Clean** Meter and then select **Next**. The dialog adjusts to show stage **2: Define measurements and send:**
* Note that you can complete stage 2 using either a **Simple** or **Advanced** format, where the default is **Simple**.
* For the example, we'll use the **Simple** format to submit our test usage data measurements:
* **UID**. This field is automatically populated with a unique id for the measurement. For the example, we'll use this as our measurement id.
* **Timestamp**. The timestamp field is also automatically populated using the date/time the dialog was opened, and again for the example we'll use this as the timestamp for the measurement.
* **Meter**. The Meter **Code** is automatically entered.
* **Account**. The **Code** of the Account we're submitting the data measurement for is automatically entered.
* **Data fields**. The three Data Fields we set up for the Meter are shown with empty **Value** fields.
4. Enter some test data **Values** for each of the Data Fields:
* **GigaByte Store** = 350
* **Graphic File Submits** = 8
* **Process Time** = 29
 11. When the Bill has generated, it will be listed on the **Bills** tab for the Account. Select the **Reference** hotlink text to open the Bill in **Bill management**.
Before checking a sample Bill we've generated for the Account, we can calculate manually what the cumulative usage charges should be for each part of the usage-based pricing we've implemented:
* **GigaBytes Stored**. The total amounts to 350 + 650 + 550 = 1,550 GiBy. The tiered pricing structure we've set up means the charge for the first 500 at \$0.15 per GiBy = \$75 plus the charge for the remaining 1,050 at \$0.10 per GiBy = \$105. Total = \$180.
* **File Submits**. The total number of files submitted is 30. At the flat rate of \$0.50 per file, the charge = \$15.
* **Processing Average**. The maximum average processing time for the three data submissions results from the second submission, where 12 files were submitted and which required a total of 53 seconds processing time. The average processing time in this case is 53/12 = 4.4167 seconds. Because this is more than 4, charge = \$25.
The Bill for the Account should be the total of these three usage charges = \$220 plus the standing charge of \$20 per billing period, which amounts to an overall total = \$240.
For the example, we can see that the Bill based on test usage data we submitted has been calculated correctly in accordance with our usage-based pricing schema:
11. When the Bill has generated, it will be listed on the **Bills** tab for the Account. Select the **Reference** hotlink text to open the Bill in **Bill management**.
Before checking a sample Bill we've generated for the Account, we can calculate manually what the cumulative usage charges should be for each part of the usage-based pricing we've implemented:
* **GigaBytes Stored**. The total amounts to 350 + 650 + 550 = 1,550 GiBy. The tiered pricing structure we've set up means the charge for the first 500 at \$0.15 per GiBy = \$75 plus the charge for the remaining 1,050 at \$0.10 per GiBy = \$105. Total = \$180.
* **File Submits**. The total number of files submitted is 30. At the flat rate of \$0.50 per file, the charge = \$15.
* **Processing Average**. The maximum average processing time for the three data submissions results from the second submission, where 12 files were submitted and which required a total of 53 seconds processing time. The average processing time in this case is 53/12 = 4.4167 seconds. Because this is more than 4, charge = \$25.
The Bill for the Account should be the total of these three usage charges = \$220 plus the standing charge of \$20 per billing period, which amounts to an overall total = \$240.
For the example, we can see that the Bill based on test usage data we submitted has been calculated correctly in accordance with our usage-based pricing schema:
 **Deploying to Production**: Having submitted some metered test data against a test Account, generated a Bill for the Account, and confirmed that charges are in accordance with our pricing requirements for consumption of our Product, we can be comfortable deploying our usage-based pricing implementation to live production.
> **More Details:** [Submitting Test Usage Data](/guides/billing-and-usage-data/submitting-usage-data/submitting-test-usage-data) and [Running Bills Manually](/guides/billing-and-usage-data/running-viewing-and-managing-bills/running-bills-and-viewing-bill-details#running-bills-manually)
**Deploying to Production**: Having submitted some metered test data against a test Account, generated a Bill for the Account, and confirmed that charges are in accordance with our pricing requirements for consumption of our Product, we can be comfortable deploying our usage-based pricing implementation to live production.
> **More Details:** [Submitting Test Usage Data](/guides/billing-and-usage-data/submitting-usage-data/submitting-test-usage-data) and [Running Bills Manually](/guides/billing-and-usage-data/running-viewing-and-managing-bills/running-bills-and-viewing-bill-details#running-bills-manually)