> ## Documentation Index
> Fetch the complete documentation index at: https://docs.m3ter.com/llms.txt
> Use this file to discover all available pages before exploring further.
# Creating and Managing External Mappings
When you integrate your 3rd-party external systems with the m3ter platform, entities and fields in external systems are mapped to m3ter entities and fields. *External Mappings* are created and act as mapping reference lookups for which entities and fields have been mapped across two or more systems. You can review these mapping references on the **External Mappings** page under **Integrations** where they are listed.
When you are working to set up your Integrations and want to test or troubleshoot your implementation before going live, you might need to create External Mappings manually and, at a later date, edit or delete them. You can also create *bulk mappings* for specific mapping types.
If you want to create multiple separate integrations for an external system, you can create external mappings for each separate integration, and these external mappings are then *linked to* the specific integration they were created for.
This topic explains how to create and manage the External Mapping needed for the integrations with external systems you've set up for your Organization:
* [Creating Single External Mappings](/guides/integrations/setting-up-integrations/creating-and-managing-external-mappings#creating-single-external-mappings)
* [Creating Bulk External Mappings](/guides/integrations/setting-up-integrations/creating-and-managing-external-mappings#creating-bulk-external-mappings)
* [Viewing and Managing External Mappings](/guides/integrations/setting-up-integrations/creating-and-managing-external-mappings#viewing-and-managing-external-mappings)
* [Creating Linked External Mappings](/guides/integrations/setting-up-integrations/creating-and-managing-external-mappings#creating-linked-external-mappings)
**Tip: Reviewing External Mappings for Entities?** On the Details pages for m3ter entities, any External mappings created for an entity are listed on the **Entity metadata** panel. You can then create External Mappings for the entity directly from there. For an example of how to do this, see [Creating and Managing External Mappings for Accounts](/guides/end-customer-accounts/creating-and-managing-external-mappings-for-accounts).
## Creating Single External Mappings
From the **External mappings** page, you can create a single mapping of a specific mapping type.
**To create a single External Mapping:**
1. Select **Integrations**:
 The **Integrations** page opens.
2. Select **External mappings**:
The **Integrations** page opens.
2. Select **External mappings**:
 The **External mappings** page opens and lists the mappings in your Organization by external system. The page will open for the external system mappings you last viewed.
3. Select the external system you want to view the external mappings for:
The **External mappings** page opens and lists the mappings in your Organization by external system. The page will open for the external system mappings you last viewed.
3. Select the external system you want to view the external mappings for:
 In this example, we've selected to view the external mappings created for Xero integrations. Note that:
* The external systems available for creating external mappings for their integrations with m3ter are shown across the top of the page.
* If you want to view external mappings for another system, select it's icon. The icon will be highlighted as the selected system.
* For each external mapping, you can read off:
* **Entity type**. The m3ter entity the mapping is for.
* **External table**. The external table in the external system for the entity that is mapped to.
* **Linked integration**. If you've created the mapping as a *linked external mapping*, which means it can only be used for a specific integration for the external system, then the name of the specific integration is shown and you can select the hotlink text to open the integration's details page directly. See [Creating Linked External Mappings](/guides/integrations/setting-up-integrations/creating-and-managing-external-mappings#creating-linked-external-mappings) below for more details.
* **m3ter ID**. The id of the m3ter entity the mapping is for.
* **External entity ID**. The id of the external system entity that is mapped to.
4. Select **Create external mapping**. To create a mapping, you must complete a two-stage workflow and the **Create** page opens ready for you to complete **Stage 1**.
**Stage 1 - Select mapping type:**
5. Enter **External mapping settings**:
* Use the **Entity type** drop-down to select the m3ter entity type you want to use to create the mapping type.
* Use the **External system** drop-down to select the 3rd-party system referenced.
* Use the **External table** drop-down to select the table in the selected 3rd-party system that you want to use for the mapping type:
In this example, we've selected to view the external mappings created for Xero integrations. Note that:
* The external systems available for creating external mappings for their integrations with m3ter are shown across the top of the page.
* If you want to view external mappings for another system, select it's icon. The icon will be highlighted as the selected system.
* For each external mapping, you can read off:
* **Entity type**. The m3ter entity the mapping is for.
* **External table**. The external table in the external system for the entity that is mapped to.
* **Linked integration**. If you've created the mapping as a *linked external mapping*, which means it can only be used for a specific integration for the external system, then the name of the specific integration is shown and you can select the hotlink text to open the integration's details page directly. See [Creating Linked External Mappings](/guides/integrations/setting-up-integrations/creating-and-managing-external-mappings#creating-linked-external-mappings) below for more details.
* **m3ter ID**. The id of the m3ter entity the mapping is for.
* **External entity ID**. The id of the external system entity that is mapped to.
4. Select **Create external mapping**. To create a mapping, you must complete a two-stage workflow and the **Create** page opens ready for you to complete **Stage 1**.
**Stage 1 - Select mapping type:**
5. Enter **External mapping settings**:
* Use the **Entity type** drop-down to select the m3ter entity type you want to use to create the mapping type.
* Use the **External system** drop-down to select the 3rd-party system referenced.
* Use the **External table** drop-down to select the table in the selected 3rd-party system that you want to use for the mapping type:
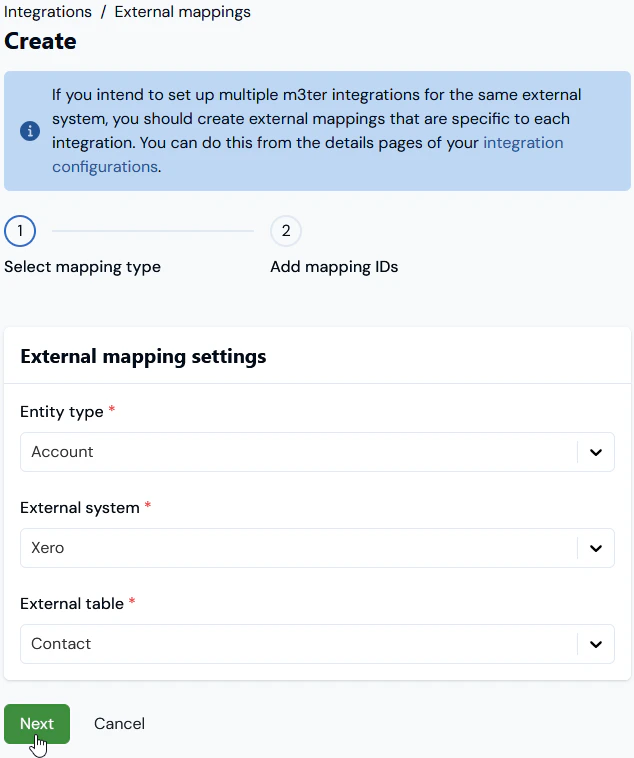 * In this example, we've chosen to create an **Account \<> Contact** mapping for **m3ter \<> Xero**.
**Tip: Settings are searchable.** The three drop-down selection fields for **External mapping settings** are searchable - if you start to enter the value you require, the list will be filtered according to your text input.
6. When you've completed the mapping type set up, select **Next**. The page adjusts to allow you to complete **Stage 2**.
**Stage 2 - Add mapping IDs:**
* The **Entity type**, **External System**, and **External table** you configured for **Stage 1** are shown.
* **Linked integration**. Note that because you started the create external mapping workflow from the general **External mappings** page, this mapping will *not be linked* to a specific integration for the external system.
7. On **External mappings details**:
* Use the **m3ter entity** drop-down to enter the specific m3ter entity of the type you've selected in **Stage 1** - in this example a m3ter Account - you want to create the mapping for.
**Tip: m3ter entity field is a drop-down selection field?**
* Depending on the m3ter entity type you are creating the mapping for, the m3ter entity field might show as a drop-down selection field - for example if you are mapping Account entities. In this kind of case, you can select the m3ter entity by Name/Code. Note that the list of m3ter entities available for selection will be filtered to show only those entities of that type for which a mapping of the selected type has not yet been created.
* If the m3ter entity field does not show as a drop-down selection, such as when you are creating a mapping for m3ter Bill Line Items, then you can enter the entity's ID.
* In the **External entity ID** field, enter the ID of the external system entity you want to map to.
**Tip: Possibles values might show!** Note that if the possible values for the **External entity ID** field can be fetched for the external system, then you can use a drop-down list to select the value for this field from the list of possible values returned.
* In this example, we've chosen to create an **Account \<> Contact** mapping for **m3ter \<> Xero**.
**Tip: Settings are searchable.** The three drop-down selection fields for **External mapping settings** are searchable - if you start to enter the value you require, the list will be filtered according to your text input.
6. When you've completed the mapping type set up, select **Next**. The page adjusts to allow you to complete **Stage 2**.
**Stage 2 - Add mapping IDs:**
* The **Entity type**, **External System**, and **External table** you configured for **Stage 1** are shown.
* **Linked integration**. Note that because you started the create external mapping workflow from the general **External mappings** page, this mapping will *not be linked* to a specific integration for the external system.
7. On **External mappings details**:
* Use the **m3ter entity** drop-down to enter the specific m3ter entity of the type you've selected in **Stage 1** - in this example a m3ter Account - you want to create the mapping for.
**Tip: m3ter entity field is a drop-down selection field?**
* Depending on the m3ter entity type you are creating the mapping for, the m3ter entity field might show as a drop-down selection field - for example if you are mapping Account entities. In this kind of case, you can select the m3ter entity by Name/Code. Note that the list of m3ter entities available for selection will be filtered to show only those entities of that type for which a mapping of the selected type has not yet been created.
* If the m3ter entity field does not show as a drop-down selection, such as when you are creating a mapping for m3ter Bill Line Items, then you can enter the entity's ID.
* In the **External entity ID** field, enter the ID of the external system entity you want to map to.
**Tip: Possibles values might show!** Note that if the possible values for the **External entity ID** field can be fetched for the external system, then you can use a drop-down list to select the value for this field from the list of possible values returned.
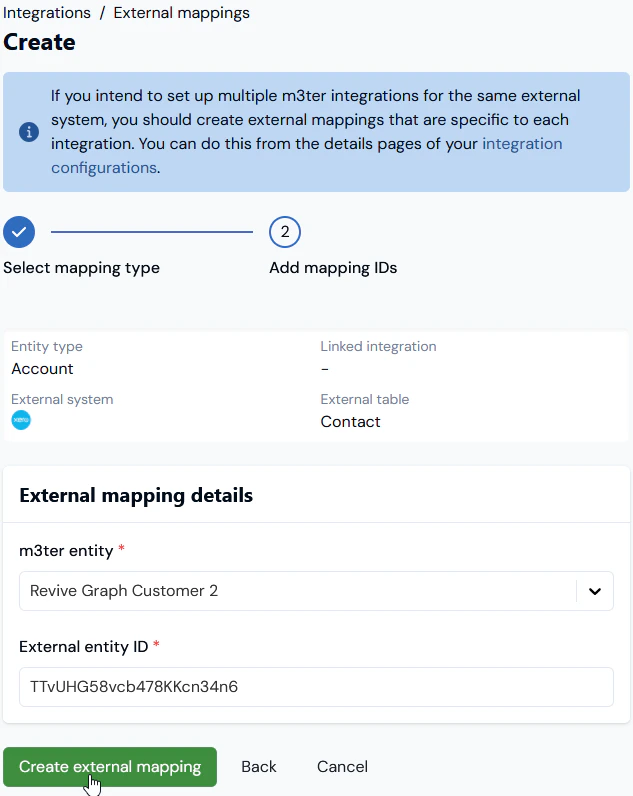 8. Select **Create external mapping**. The **Create** page closes and the new external mapping is shown on the **External mappings** page for the external system:
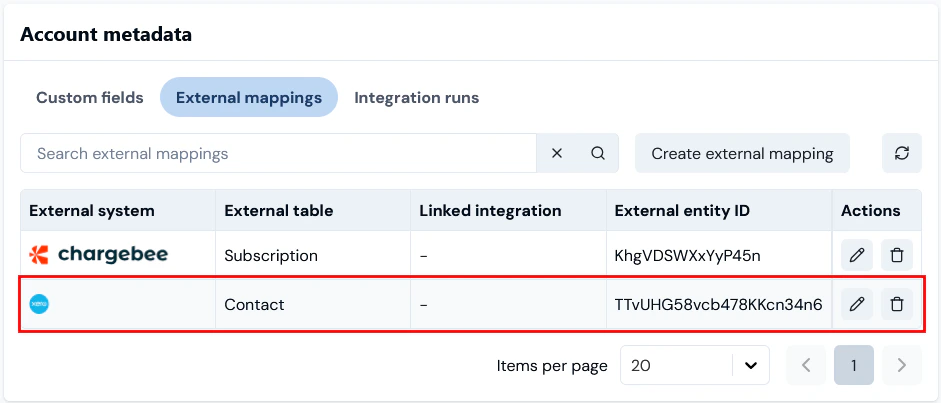
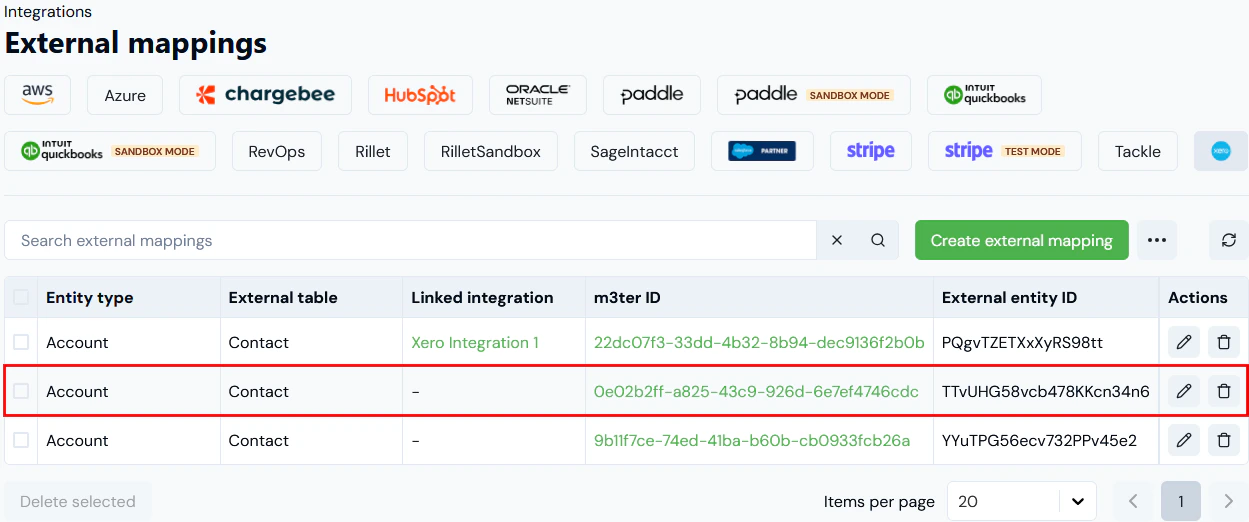 * Note that if you select the hotlink text for the **m3ter ID**, this will open the **Details** page for the m3ter entity - in this example the **Clean Graph Customer 1** Account - where the new external mapping will be listed under **Account metadata**. You can start a **Create external mapping** workflow for the Account from there - see [Creating and Managing External Mappings for Accounts](/guides/end-customer-accounts/creating-and-managing-external-mappings-for-accounts) for more details:
 ## Creating Bulk External Mappings
From the **External mappings** page, you can create mappings in bulk for a specific mapping type for an external system:
**To create External mappings in bulk:**
1. Select **Integrations**:
## Creating Bulk External Mappings
From the **External mappings** page, you can create mappings in bulk for a specific mapping type for an external system:
**To create External mappings in bulk:**
1. Select **Integrations**:
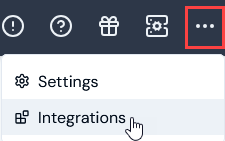 The **Integrations** page opens.
2. Select **External mappings**:
The **External mappings** page opens.
3. Select the three-dot menu button at top-right of the page and then select **Create in bulk**:
The **Integrations** page opens.
2. Select **External mappings**:
The **External mappings** page opens.
3. Select the three-dot menu button at top-right of the page and then select **Create in bulk**:
 To create mappings in bulk, you must complete a two-stage workflow and the **Create in bulk** page opens ready for you to complete **Stage 1**.
**Stage 1 - Select mapping type:**
4. Enter **External mapping settings**:
* Use the **Entity type** drop-down to select the m3ter entity type you want to use to create the mapping type.
* The **External system** drop-down field will be preselected for the external system - in this example Chargebee.
* Use the **External table** drop-down to select the table in the selected 3rd-party system that you want to use for the mapping type:
To create mappings in bulk, you must complete a two-stage workflow and the **Create in bulk** page opens ready for you to complete **Stage 1**.
**Stage 1 - Select mapping type:**
4. Enter **External mapping settings**:
* Use the **Entity type** drop-down to select the m3ter entity type you want to use to create the mapping type.
* The **External system** drop-down field will be preselected for the external system - in this example Chargebee.
* Use the **External table** drop-down to select the table in the selected 3rd-party system that you want to use for the mapping type:
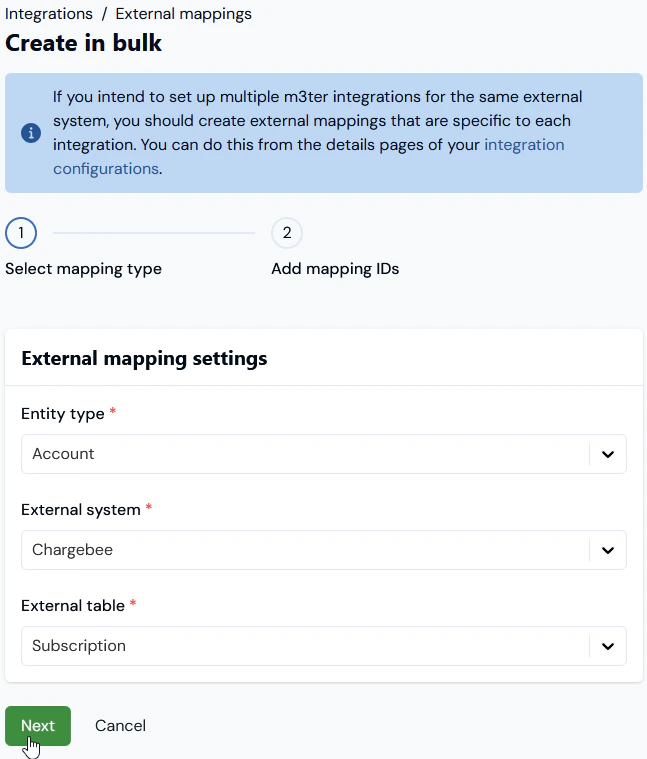 * In this example, we've chosen to create **Account \<> Subscription** mappings in bulk for **m3ter \<> Chargebee**.
5. When you've completed the mapping type set up, select **Next**. The page adjusts to allow you to complete **Stage 2**:
**Stage 2 - Add mapping IDs:**
* The **Entity type**, **External system**, and **External table** you configured for **Stage 1** are shown.
* **Linked integration**. Note that because you started the create bulk external mapping workflow from the general mappings page, none of the mappings will *not be linked* to a specific integration for the external system
6. On the **External mappings** panel, select **Add**. The page adjusts to add a row for the first mapping:
* Use the **m3ter entity** drop-down to select the specific entity in your Organization you want to create the mapping for.
**Tip: Selection is filtered!** Note that the list of m3ter entities available for selection will be filtered to show only those entities of that type - here Accounts - for which a mapping of the selected type has not yet been created.
* In the **External entity ID** field, enter the id of the external system entity you want to map to.
**Tip: Possibles values might show!** Note that if the possible values for the **External entity ID** field can be fetched for the external system, then you can use a drop-down list to select the value for this field from the list of possible values returned.
7. Select **Add** again and repeat up to a maximum of 20 mappings of the selected type:
* In this example, we've chosen to create **Account \<> Subscription** mappings in bulk for **m3ter \<> Chargebee**.
5. When you've completed the mapping type set up, select **Next**. The page adjusts to allow you to complete **Stage 2**:
**Stage 2 - Add mapping IDs:**
* The **Entity type**, **External system**, and **External table** you configured for **Stage 1** are shown.
* **Linked integration**. Note that because you started the create bulk external mapping workflow from the general mappings page, none of the mappings will *not be linked* to a specific integration for the external system
6. On the **External mappings** panel, select **Add**. The page adjusts to add a row for the first mapping:
* Use the **m3ter entity** drop-down to select the specific entity in your Organization you want to create the mapping for.
**Tip: Selection is filtered!** Note that the list of m3ter entities available for selection will be filtered to show only those entities of that type - here Accounts - for which a mapping of the selected type has not yet been created.
* In the **External entity ID** field, enter the id of the external system entity you want to map to.
**Tip: Possibles values might show!** Note that if the possible values for the **External entity ID** field can be fetched for the external system, then you can use a drop-down list to select the value for this field from the list of possible values returned.
7. Select **Add** again and repeat up to a maximum of 20 mappings of the selected type:
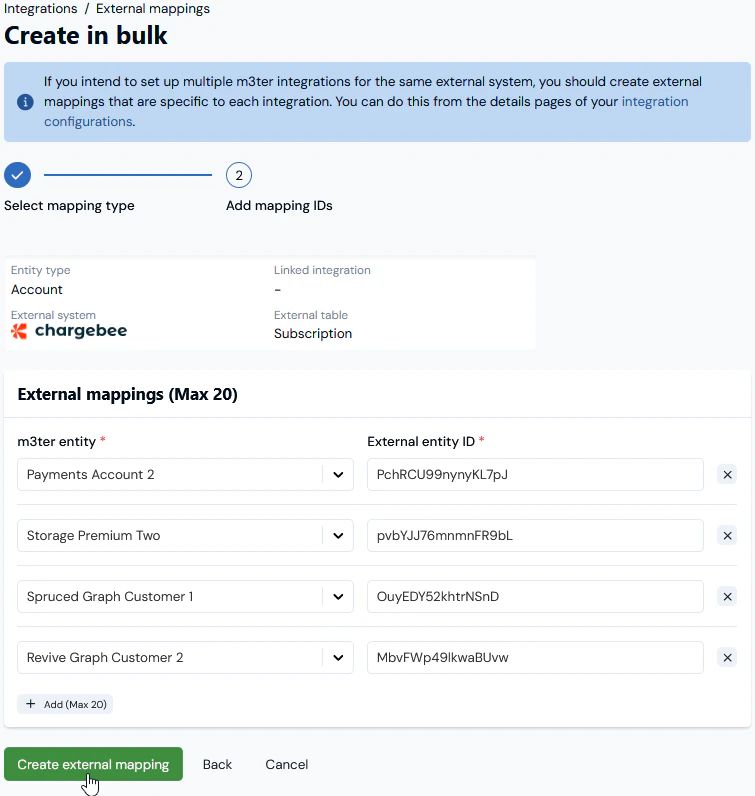 * In this example, we've added four mappings of the selected **Account \<> Subscription** mapping type for **m3ter \<> Chargebee**.
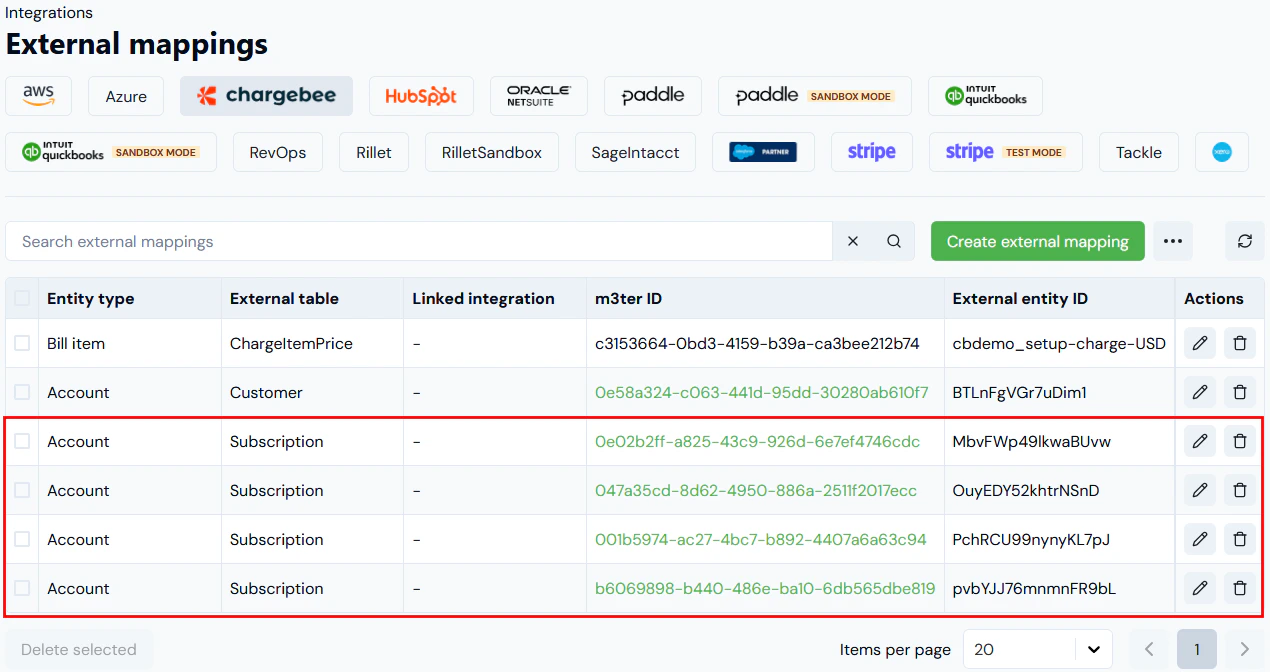
8. Select **Create external mappings**. You are returned to the **External mappings** page for the external system where the bulk mappings of the selected type are now listed:
* In this example, we've added four mappings of the selected **Account \<> Subscription** mapping type for **m3ter \<> Chargebee**.
8. Select **Create external mappings**. You are returned to the **External mappings** page for the external system where the bulk mappings of the selected type are now listed:
 ## Viewing and Managing External Mappings
From the **External mappings** page you can view and manage the external mappings created for your integrations with external systems and edit or delete them:
**To view and manage External Mappings:**
1. Select **Integrations**. The **Integrations** page opens.
2. In the sidebar, select **External mappings**:
The **External mappings** page opens.
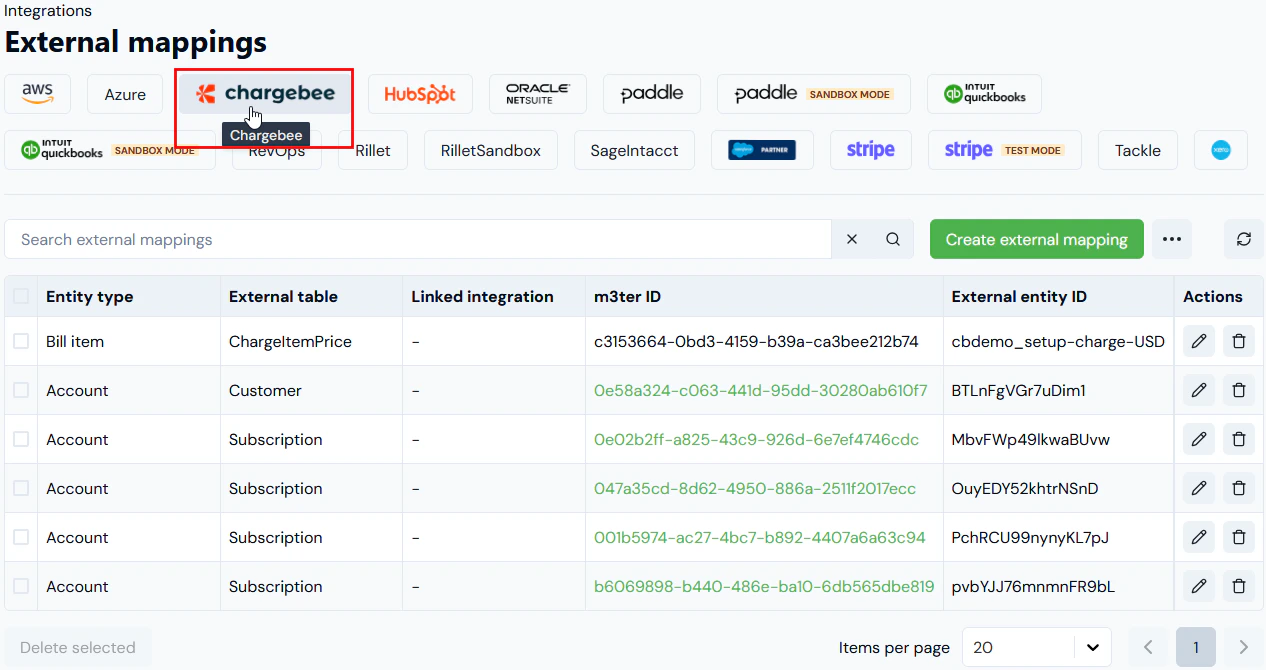
3. Select the external system you want to view and manage the external mappings for:
## Viewing and Managing External Mappings
From the **External mappings** page you can view and manage the external mappings created for your integrations with external systems and edit or delete them:
**To view and manage External Mappings:**
1. Select **Integrations**. The **Integrations** page opens.
2. In the sidebar, select **External mappings**:
The **External mappings** page opens.
3. Select the external system you want to view and manage the external mappings for:
 4. If you want to edit a mapping, select **Edit**:
 5. On the **Edit** page, make your changes and select **Update external mapping**.
6. If you want to delete a single mapping, select **Delete**:
5. On the **Edit** page, make your changes and select **Update external mapping**.
6. If you want to delete a single mapping, select **Delete**:
 A confirmation pop-up appears. Select **Yes** to complete the delete action.
7. If you want to delete multiple mappings, check those you want to delete and click **Delete selected**:
A confirmation pop-up appears. Select **Yes** to complete the delete action.
7. If you want to delete multiple mappings, check those you want to delete and click **Delete selected**:
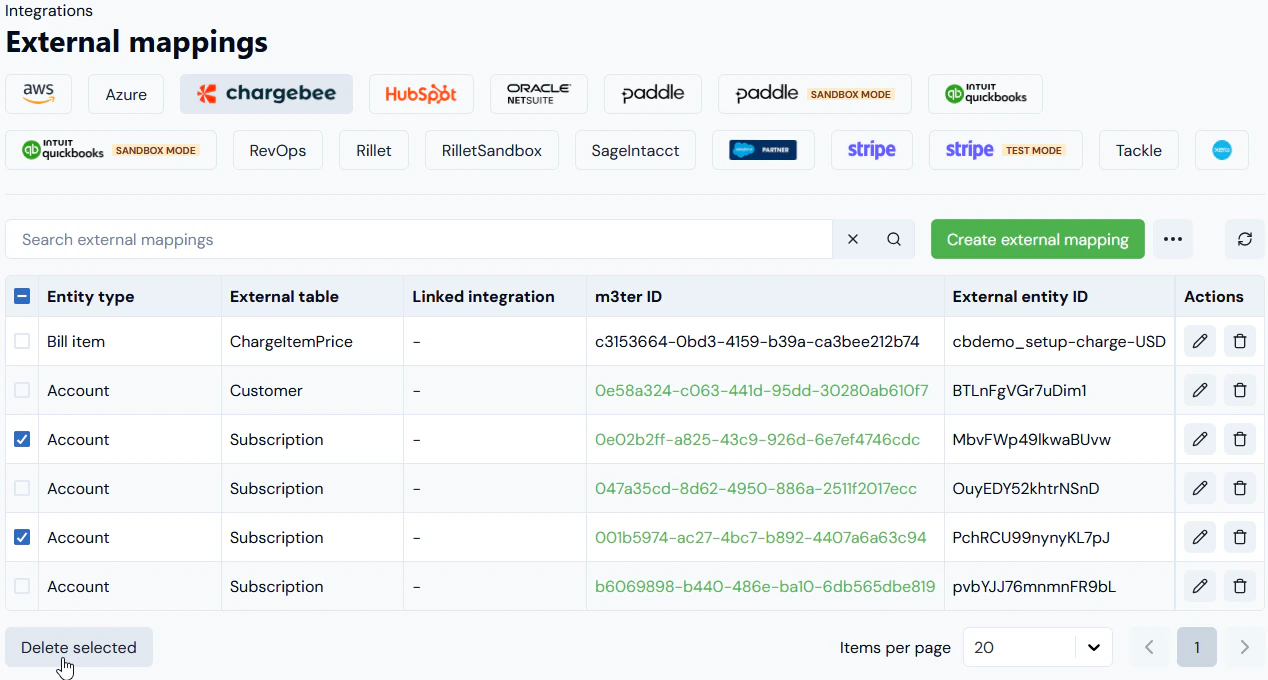 ## Creating Linked External Mappings
If you intend to set up multiple integrations in m3ter with an external system, it's a good idea to create separate external mappings for use with each separate integration. You can do this by creating *linked external mappings* from the details page of each of the integrations you've set up for an external system.
For example, you might have your Xero system set up for two invoicing locations for your end-customers - UK and Europe. To serve this kind of use case:
* You can set **Xero Integration 1** for Bills outbound to your **Xero UK** invoicing instance and then create any required external mappings for the integration as linked to **Xero Integration 1**.
* You can set **Xero Integration 2** for Bills outbound to your **Xero Europe** invoicing instance and then create any required external mappings for the integration as linked to **Xero Integration 2**.
**To create linked External mappings:**
1. Select **Integrations**:
The **Integrations** page opens.
2. Select the external system you want to create a linked external mappings for:
## Creating Linked External Mappings
If you intend to set up multiple integrations in m3ter with an external system, it's a good idea to create separate external mappings for use with each separate integration. You can do this by creating *linked external mappings* from the details page of each of the integrations you've set up for an external system.
For example, you might have your Xero system set up for two invoicing locations for your end-customers - UK and Europe. To serve this kind of use case:
* You can set **Xero Integration 1** for Bills outbound to your **Xero UK** invoicing instance and then create any required external mappings for the integration as linked to **Xero Integration 1**.
* You can set **Xero Integration 2** for Bills outbound to your **Xero Europe** invoicing instance and then create any required external mappings for the integration as linked to **Xero Integration 2**.
**To create linked External mappings:**
1. Select **Integrations**:
The **Integrations** page opens.
2. Select the external system you want to create a linked external mappings for:
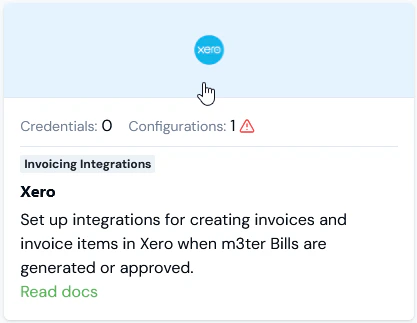 The **Integrations** page for the external system opens.
3. On the **Configurations** panel, select the name hotlink text of the integration you want to create a linked external mapping for:
The **Integrations** page for the external system opens.
3. On the **Configurations** panel, select the name hotlink text of the integration you want to create a linked external mapping for:
 The **Integration details** page opens.
4. Scroll down the page and on the **Linked external mappings** panel select **Create external mapping**:
The **Integration details** page opens.
4. Scroll down the page and on the **Linked external mappings** panel select **Create external mapping**:
 To create a mapping, you must complete a two-stage workflow and the **Create** page opens allowing you to complete **Stage 1**.
**Stage 1 - Select mapping type:**
5. Enter **External mapping settings**:
* Use the **Entity type** drop-down to select the m3ter entity type you want to use to create the mapping type.
* The **External system** drop-down is preselected for the external system.
* Use the **External table** drop-down to select the table in the external system that you want to use for the mapping type:
To create a mapping, you must complete a two-stage workflow and the **Create** page opens allowing you to complete **Stage 1**.
**Stage 1 - Select mapping type:**
5. Enter **External mapping settings**:
* Use the **Entity type** drop-down to select the m3ter entity type you want to use to create the mapping type.
* The **External system** drop-down is preselected for the external system.
* Use the **External table** drop-down to select the table in the external system that you want to use for the mapping type:
 6. When you've completed the mapping type set up, select **Next**. The page adjusts to allow you to complete **Stage 2**:
**Stage 2 - Add mapping IDs:**
* The **Entity type**, **External System**, and **External table** you configured for **Stage 1** are shown.
* **Linked integration**. Note that because you started the create external mapping workflow from the Integration details page, this mapping will *be linked* *to the specific integration* for the external system and cannot be used for any other integration you've set up with that external system.
7. On **External mappings details**:
* Use the **m3ter entity** drop-down to enter the specific m3ter entity of the type you've selected in **Stage 1** - in this example the m3ter Account - you want to create the mapping for.
**Tip: m3ter entity field is a drop-down selection field?**
* Depending on the m3ter entity type you are creating the mapping for, the m3ter entity field might show as a drop-down selection field - for example if you are mapping Account entities. In this kind of case, you can select the m3ter entity by Name/Code. Note that the list of m3ter entities available for selection will be filtered to show only those entities of that type for which a mapping of the selected type has not yet been created.
* If the m3ter entity field does not show as a drop-down selection, such as when you are creating a mapping for m3ter Bill Line Items, then you can enter the entity's ID.
* In the **External entity ID** field, enter the ID of the 3rd-party system entity you want to map to.
**Tip: Possibles values might show!** Note that if the possible values for the **External entity ID** field can be fetched for the **External system**, then you can use a drop-down list to select the value for this field from the list of possible values returned.
6. When you've completed the mapping type set up, select **Next**. The page adjusts to allow you to complete **Stage 2**:
**Stage 2 - Add mapping IDs:**
* The **Entity type**, **External System**, and **External table** you configured for **Stage 1** are shown.
* **Linked integration**. Note that because you started the create external mapping workflow from the Integration details page, this mapping will *be linked* *to the specific integration* for the external system and cannot be used for any other integration you've set up with that external system.
7. On **External mappings details**:
* Use the **m3ter entity** drop-down to enter the specific m3ter entity of the type you've selected in **Stage 1** - in this example the m3ter Account - you want to create the mapping for.
**Tip: m3ter entity field is a drop-down selection field?**
* Depending on the m3ter entity type you are creating the mapping for, the m3ter entity field might show as a drop-down selection field - for example if you are mapping Account entities. In this kind of case, you can select the m3ter entity by Name/Code. Note that the list of m3ter entities available for selection will be filtered to show only those entities of that type for which a mapping of the selected type has not yet been created.
* If the m3ter entity field does not show as a drop-down selection, such as when you are creating a mapping for m3ter Bill Line Items, then you can enter the entity's ID.
* In the **External entity ID** field, enter the ID of the 3rd-party system entity you want to map to.
**Tip: Possibles values might show!** Note that if the possible values for the **External entity ID** field can be fetched for the **External system**, then you can use a drop-down list to select the value for this field from the list of possible values returned.
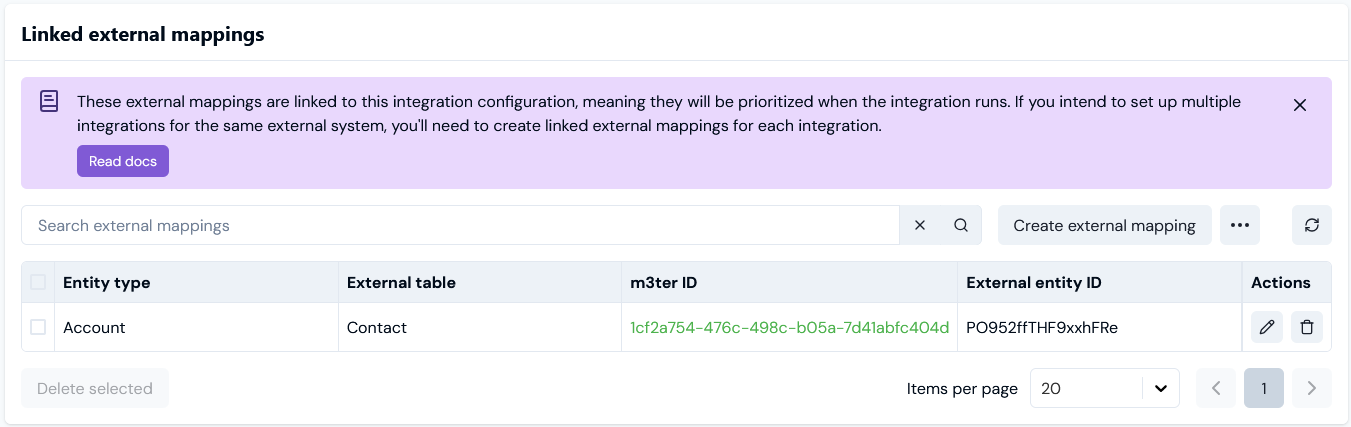
 8. Select **Create External mapping**. The **Create** page closes and the new external mapping is shown on the **Linked external mappings** panel for the integration: