> ## Documentation Index
> Fetch the complete documentation index at: https://docs.m3ter.com/llms.txt
> Use this file to discover all available pages before exploring further.
# Creating Global Meters
This topic explains how to create Global Meters to collect usage data that you want to use to set up usage-based pricing across multiple Products:
* Any Aggregations that target a Global Meter also become Global and can be used to to price Plans for any Product.
* Global Meters can also be used to collect user data you require to serve other business purposes.
**Tip: Product-specific Meters?** You can also create *Product Meters*, which allow you to collect usage data for specific Products. Any Aggregations that target a Product-specific Meter also then belongs to the same specific Product and can only be used to price Plans belonging to that Product. See [Creating Product Meters](/guides/usage-data-meters/creating-meters).
**Understanding Meter Options!** We *strongly recommend* that you review the options available for configuring Meters before you attempt to create them. See [Reviewing Meter Options](/guides/usage-data-meters/reviewing-meter-options).
**To create a Global Meter:**
1. Select **Metering**. The **Meters** page opens and lists Meters by Product for **All products** together with any **Global** Meters.
2. Under **Global** select **Create meter**.
* Alternatively, you can select **Create meter** at top-right of the page.
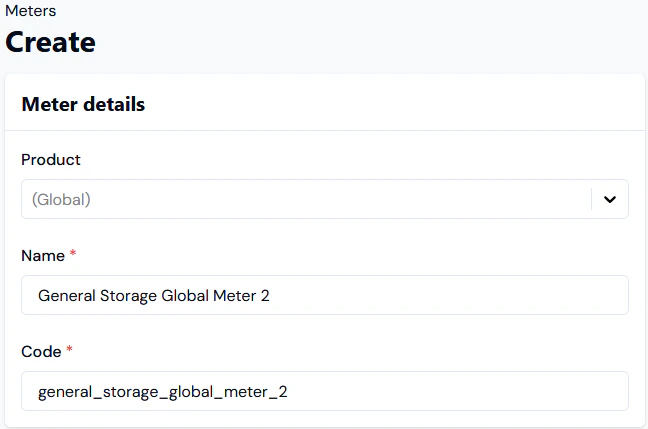
The **Create** page opens:
* Note that for **Product**, **(Global)** is pre-selected.
3. Enter the **Meter** **details**:
* **Name.** Descriptive name for the Meter.
* **Code.** Unique identifier for the **Meter** in the m3ter system. You will need this **Code** as a unique id when submitting API calls, such as a call to update a Meter.
* **Notes**:
* When you've entered a **Name** and clicked in the **Code** field, a string is automatically entered based on the **Name** string. You can then edit the auto-generated **Code** as required.
* The **Code** string has a maximum length of 80 characters and must not contain non-printable or whitespace characters (except space), and cannot start/end with whitespace.
 4. **Add** the **Data fields** you need to collect usage data. For example, a field to collect data on the volume of files stored on your service:
* **Name.** Descriptive name for the field.
* **Code.** Unique Identifier for field. You will need this **Code** as a unique id when submitting API calls, such as a call to submit measurements for this field.
* **Notes**:
* When you've entered a **Name** and clicked in the **Code** field, a string is automatically entered based on the **Name** string. You can then edit the auto-generated Code as required.
* The **Code** string has a maximum length of 80 characters and can only contain letters, numbers, underscore, and the dollar character, and must not start with a number. The same applies to the Code used for any Derived Fields you add to a Meter - see Step 6 below.
* **Category.** Defines what type of usage data you want to collect using this field. Select a **Measure** field type for this example.
* **Unit.** Defines the unit of measure.
4. **Add** the **Data fields** you need to collect usage data. For example, a field to collect data on the volume of files stored on your service:
* **Name.** Descriptive name for the field.
* **Code.** Unique Identifier for field. You will need this **Code** as a unique id when submitting API calls, such as a call to submit measurements for this field.
* **Notes**:
* When you've entered a **Name** and clicked in the **Code** field, a string is automatically entered based on the **Name** string. You can then edit the auto-generated Code as required.
* The **Code** string has a maximum length of 80 characters and can only contain letters, numbers, underscore, and the dollar character, and must not start with a number. The same applies to the Code used for any Derived Fields you add to a Meter - see Step 6 below.
* **Category.** Defines what type of usage data you want to collect using this field. Select a **Measure** field type for this example.
* **Unit.** Defines the unit of measure.
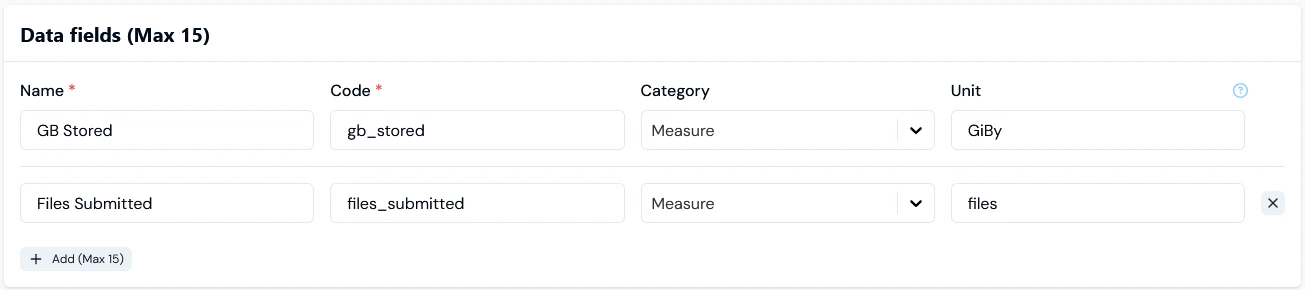 **Important: Units of Measure?** We recommend that the units you use for your Data Fields conform to *The Unified Code for Units of Measure (UCUM)*, which is designed to facilitate the communication between electronic systems of quantities with their units. In the above example, we therefore use **GiBy** as the unit for the **GB Stored** Data Field. For more details, see [Units for Meter Fields - Examples](/guides/usage-data-meters/reviewing-meter-options#units-for-meter-fields-examples).
5. **Add** any required **Derived fields** or **Custom fields** to the Meter:
* For more on Derived Fields, see the [following topic](/guides/usage-data-meters/derived-fields-for-meters-examples-and-supported-syntax).
* For more on Custom Fields, see [Adding and Editing Custom Fields](/guides/organization-and-access-management/viewing-and-editing-organization#adding-and-editing-custom-fields). We strongly recommend reviewing [Working with Custom Fields](/guides/creating-and-managing-products/working-with-custom-fields) before you create and use Custom Fields.
6. Select **Create meter**. The **Meter details** page opens:
**Important: Units of Measure?** We recommend that the units you use for your Data Fields conform to *The Unified Code for Units of Measure (UCUM)*, which is designed to facilitate the communication between electronic systems of quantities with their units. In the above example, we therefore use **GiBy** as the unit for the **GB Stored** Data Field. For more details, see [Units for Meter Fields - Examples](/guides/usage-data-meters/reviewing-meter-options#units-for-meter-fields-examples).
5. **Add** any required **Derived fields** or **Custom fields** to the Meter:
* For more on Derived Fields, see the [following topic](/guides/usage-data-meters/derived-fields-for-meters-examples-and-supported-syntax).
* For more on Custom Fields, see [Adding and Editing Custom Fields](/guides/organization-and-access-management/viewing-and-editing-organization#adding-and-editing-custom-fields). We strongly recommend reviewing [Working with Custom Fields](/guides/creating-and-managing-products/working-with-custom-fields) before you create and use Custom Fields.
6. Select **Create meter**. The **Meter details** page opens:
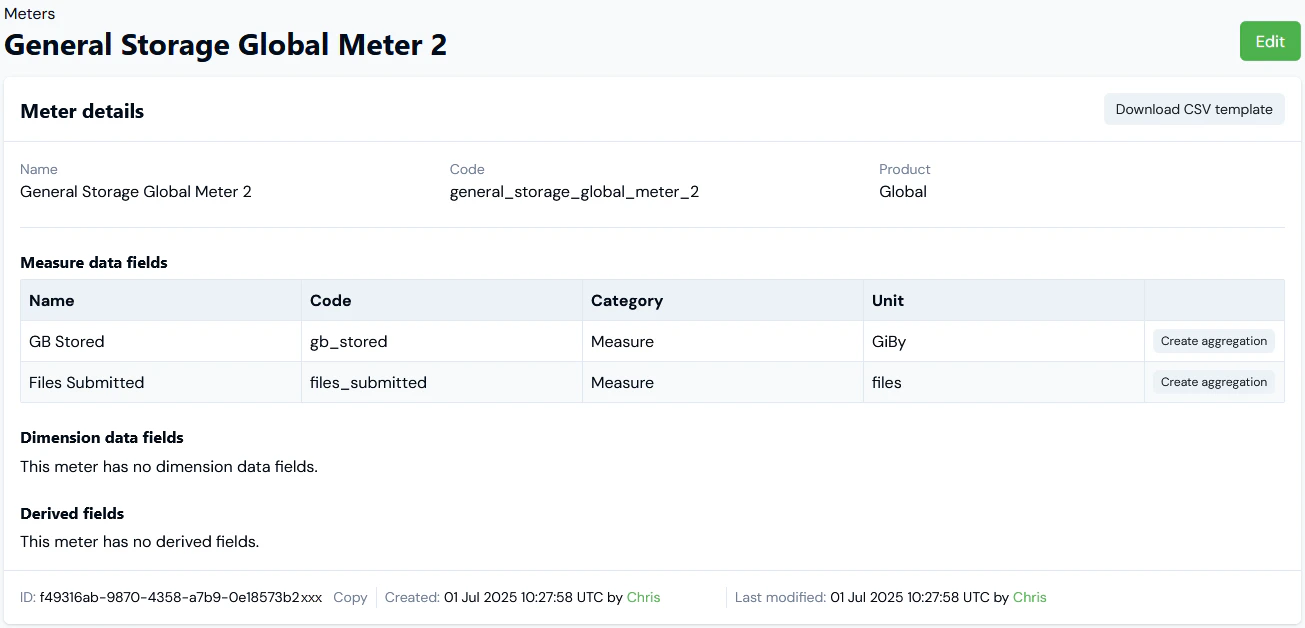 7. If you want to create an Aggregation that targets one of the Meter's Data Fields or Derived Fields, then select **Create aggregation** for that field:
* You are taken directly to the **Aggregations>Create** page where the **Product** is pre-selected for **(Global)** and the **Meter** and **Target field** under **Meter settings** are also pre-selected.
* When you complete the **Aggregations>Create** workflow, you are returned to the **Meter details** page.
* For more details, see [Creating Global Aggregations](/guides/usage-data-meters/working-in-meter-details).
8. If you want to edit a Meter's details, select the **Edit** button, make your changes, and click **Update meter**.
9. If you want to remove a Meter, return to the **Meters** page and select the **Delete** button for the Meter:
7. If you want to create an Aggregation that targets one of the Meter's Data Fields or Derived Fields, then select **Create aggregation** for that field:
* You are taken directly to the **Aggregations>Create** page where the **Product** is pre-selected for **(Global)** and the **Meter** and **Target field** under **Meter settings** are also pre-selected.
* When you complete the **Aggregations>Create** workflow, you are returned to the **Meter details** page.
* For more details, see [Creating Global Aggregations](/guides/usage-data-meters/working-in-meter-details).
8. If you want to edit a Meter's details, select the **Edit** button, make your changes, and click **Update meter**.
9. If you want to remove a Meter, return to the **Meters** page and select the **Delete** button for the Meter:
 A confirmation popup opens.
10. Select **Yes** to confirm the delete action.
**Tip: Working in Meter Details?** The **Meter details** page is designed to help you perform common Meter management and operational tasks, including submitting usage data measurements for your Meters. See [Working in Meter Details](/guides/usage-data-meters/working-in-meter-details).
A confirmation popup opens.
10. Select **Yes** to confirm the delete action.
**Tip: Working in Meter Details?** The **Meter details** page is designed to help you perform common Meter management and operational tasks, including submitting usage data measurements for your Meters. See [Working in Meter Details](/guides/usage-data-meters/working-in-meter-details).